

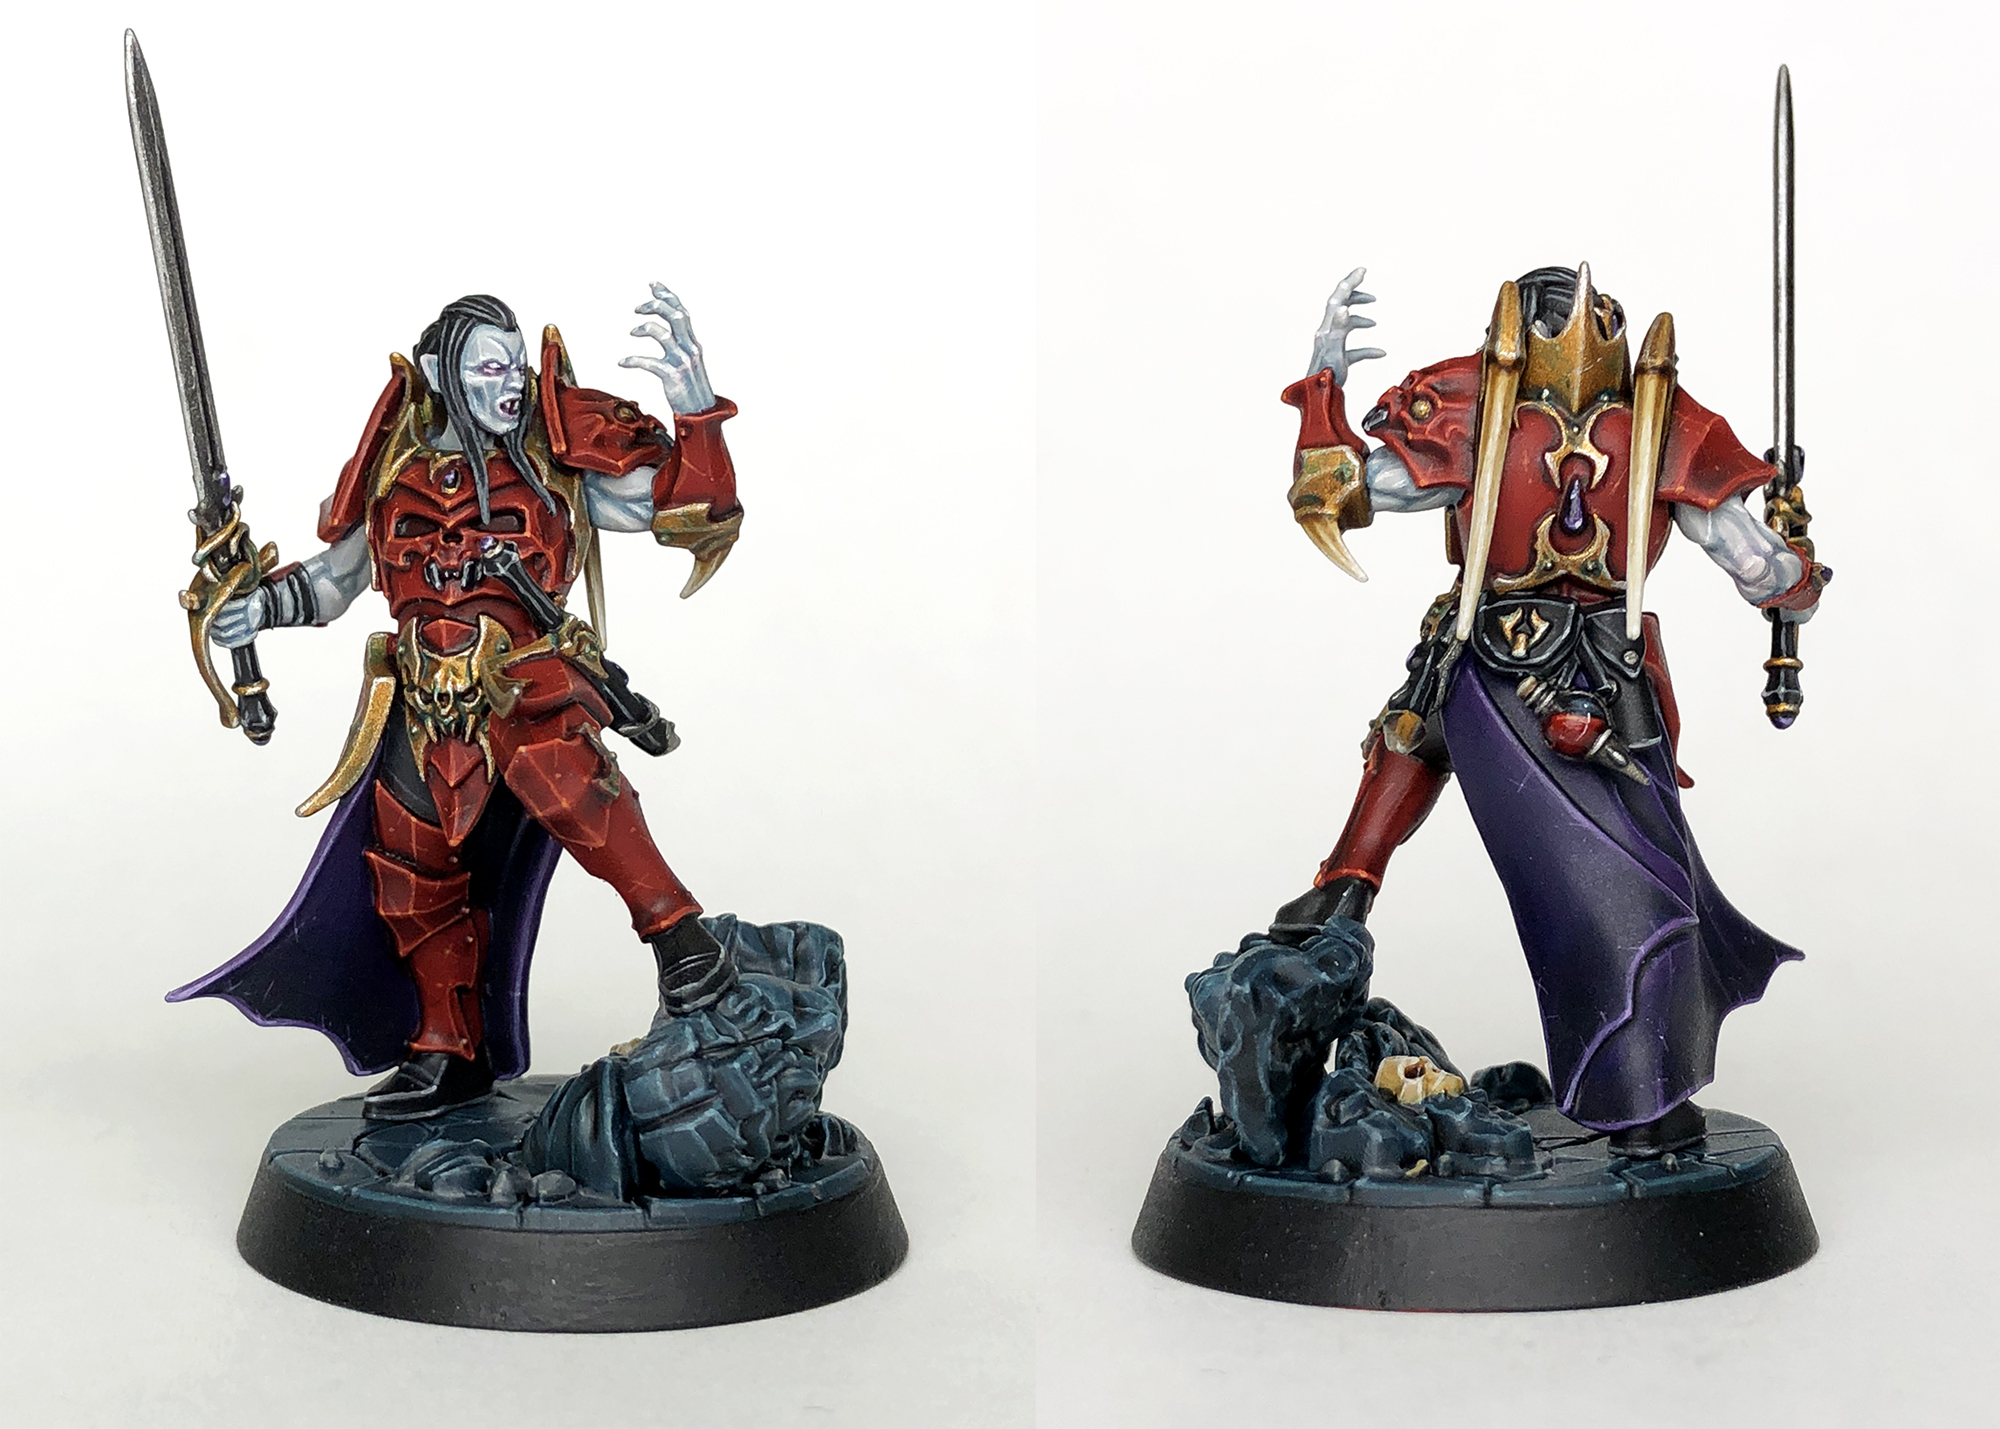
I had previously seen an awesome Soulblight Vampire model that used very saturated reds and purples for its color scheme and I always really liked it. Going into these models I wanted to do something similar, but I also wanted to make sure they fit into my existing Undead color schemes. Across all of my armies the main unifying color is purple. After that they all kind of branch out into their own colors. The Nighthaunt are mostly the ethereal color, the Bonereapers are mostly bone, so it made sense that my vampire contingent could represent the red side of things.
I also decided that I would lean into the Blood Dragons side of the vampires. To be honest, my favorite blood line was the Necrarch, but the Blood Dragons hold a very easily recognizable and iconic slot in the vampire history of Warhammer. Since I was going to be fitting these into my existing Undead a lot of the other colors were more or less decided for me. I knew how I was going to do the black and the gold for example. The skin was an interesting challenge though.

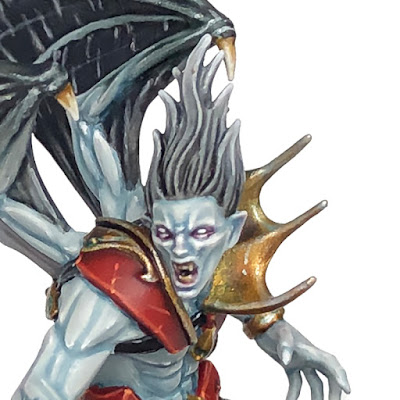
I really liked the pale look that the studio did and originally tried to duplicate it using Apothecary White for the shading. After a bit of testing though I decided I wanted to go a bit bluer and really lean into the pale, blood drained look of them. Seeing as how these four are also an Underworld's warband I have a bit more freedom with them as well. If I really want to switch it up for the main army, it'll be pretty easy to do. In the end I'm pretty happy with them and I think Abhorash would be proud.


The Pants

I decided to start off the model by painting his pants, as it would be much harder to get to them once the armor was painted. I base coated these with Corvus Black and then gave them a wash of Nuln Oil. Next I picked out the folds with thin lines of Dawnstone, followed by a more refined highlight of Grey Seer.
Red Armor

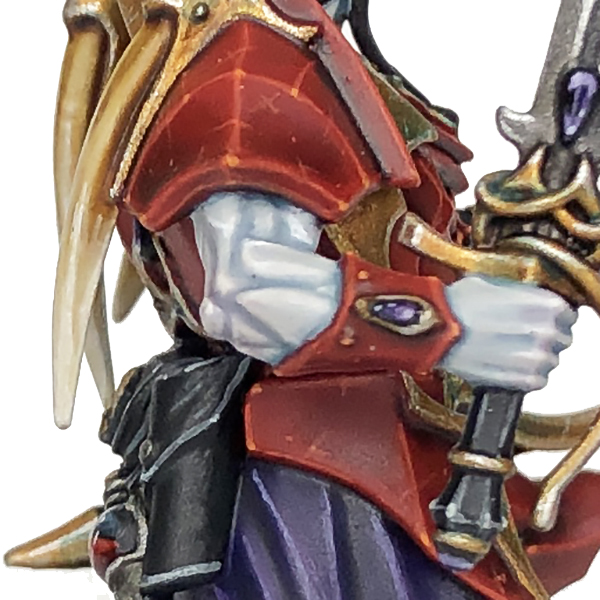
After debating a couple of colors I chose the classic red armor of the Blood Dragons. I wanted this to be a pretty saturated red, so I base coated all of it with Mephiston Red. This took a couple of coats. The next thing I did was go in with Flesh Tearers Red and pick out all of the joints and rivets in the armor. I only painted this directly where I wanted it, not all over the armor. This isn't for the general shading, this is just to make the deepest parts of the armor, such as lines between panels, darker. Next is where the magic happens. I painted over all of the armor with Carroburg Crimson. I did this a section at a time, so one leg, then the other, then the torso, etc. This way I was able to apply it more carefully and make sure there was no weird pooling. This darkens down the model, adds our shading, and tints it a little more crimson. All of the blending on the armor is actually just how this wash dried. I did very little touch ups after.

For the highlights I went back with Mephiston Red first and picked out all of the ridges and edges. This was followed by a more refined highlight of Wild Rider Red. I basically just kept it a little thinner. This is also when I painted on all of the scratches. Remember, less is more. If, once you're done, it feels like not enough you can add some more on. Finally, I used Fire Dragon Bright and picked out all of the points on the armor. This was literally just little dots on the tips and points. I would also add a little dot where two scratches intersected.
The Purple Cloth

The next largest segment was his cloak/skirt. The rest of my Death stuff uses purple as its unifying scheme, and I've really liked some Soulblight models I'd seen in the past with a purple and red combo. I started off by base coating it with Naggaroth Night. I then mixed Abaddon Black into this and watered it down a ton. This was painted into the folds, and also along the bottom third of the skirt. You'll then have to spend a bit of time smoothing out the blend between the black areas and the Naggaroth Night. I did this just by using glazes of the two colors and going back and forth between them until I was happy with it. No real trick here, just thin paints and patience. Next I started working on the highlights. I picked out the tops of the folds and edges with Xereus Purple, as well as the top third of the skirt. The top third of the skirt was then blended into the Naggaroth Night using the same methods I used to blend the last two colors. For an even brighter highlight I mixed some Dechalla Lilac into the Xereus Purple and picked out the edges and tops of the folds with a more refined line. I also added some scratches along the bottom to imply this is a heavier cloth or a leather. Finally, I used pure Dechalla Lilac for the most prominent parts of the folds and edges. This whole section involves quite a bit of blending, but the purples and blacks blend pretty smoothly. The gems were painted using these same colors, with dots of white for the reflection points.
The Skin

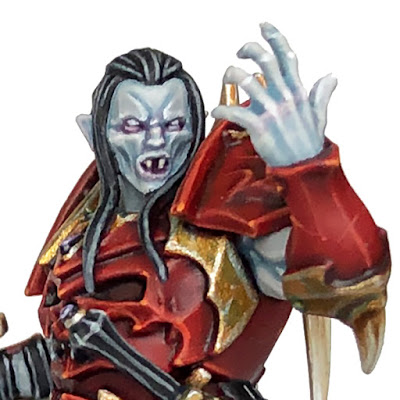
For his skin I knew I wanted something that would contrast with the red armor. I started out with a base coat of Grey Seer. This took a surprising number of coats to get a solid color, but it's best to do these thin so it's smooth. Next I took some Thunderhawk Blue and mixed just a little bit of Grey Seer into it and watered it down a ton. I then painted this into the crevices of his muscles and face. On the face you can kind of slather it all over to make sure it gets everywhere, as long as it's thin enough. I then took pure Thunderhawk Blue, also watered down, and picked out the areas I wanted the darkest, such as between the fingers and some other areas. Next, I tidied up the skin with Grey Seer, re-layering it onto the raised areas. You can do some blends using glazes to get more of a transition in areas too. This was followed by a highlight of Pallid Wych Flesh on the edges of the muscles and face. You want to keep this as thin lines, it's not an all over layer like the Grey Seer.
I then thinned down some Carroburg Crimson with Lahmian Medium and used it as a very thin glaze on areas I wanted to look more flush. On this model that included his elbows, knuckles, eyes, nose, ears, and bottom lip. I also did pure Carroburg Crimson inside of his mouth. Next I went back over these areas with Pallid Wych Flesh to re-establish the highlights. Finally, I used White Scar to pick out the most prominent areas, such as the knuckles, parts of the face, and some points on the muscles. Keep these highlights as small as possible. I mostly just did little dots of it. I also picked out the eyes with this.
Black Leather

All of the black leather and the grips on his blades were base coated with Abaddon Black. This was then followed by a highlight of Dawnstone and then a more refined highlight of Ulthuan Grey.
The Black Hair

His hair was also base coated with Abaddon Black. This was then highlighted with Mechanicus Standard Grey to keep it darker. I picked this out in strands. I followed this with a more refined and selective highlight of Dawnstone. You don't want to go over all of the previous highlights with this, the Mechanicus Standard Grey is still your "main" highlight. Lastly, I used a bit of Grey Seer in places to try and make it look like his hair had a bit of a shine.
The Blood Vial

I started off the blood vial by blocking in the blood. I base coated this with Mephiston Red. I then gave the blood a wash of Carroburg Crimson, and highlighted near the top of the "fill line" with Mephiston Red again. This was followed by Wild Rider Red. I also did some small dots of this further down in the blood to look like bubbles. The dark part of the glass was base coated with Abaddon Black. I then mixed in Thunderhawk Blue and built up a gradient over a few layers, with more Thunderhawk Blue added each time. This was finished off using White Scar to paint the reflection lines and dots.
The Bone

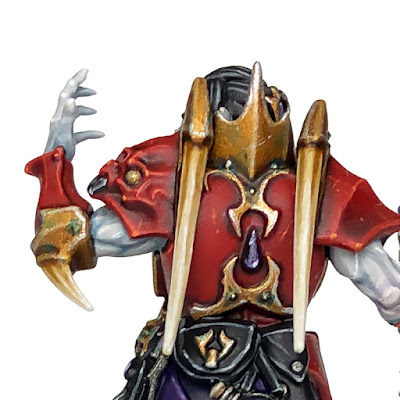
All of the bone areas, including the horns on his armor, were base coated with Morghast Bone. These were then washed with Seraphim Sepia, then tidied up with Morghast Bone. On the horns this was done in growth lines. This was followed by Screaming Skull on the horns, which was also used to pick out his teeth, and then White Scar. On the skulls and such I skipped the Screaming Skull step.
The Silver

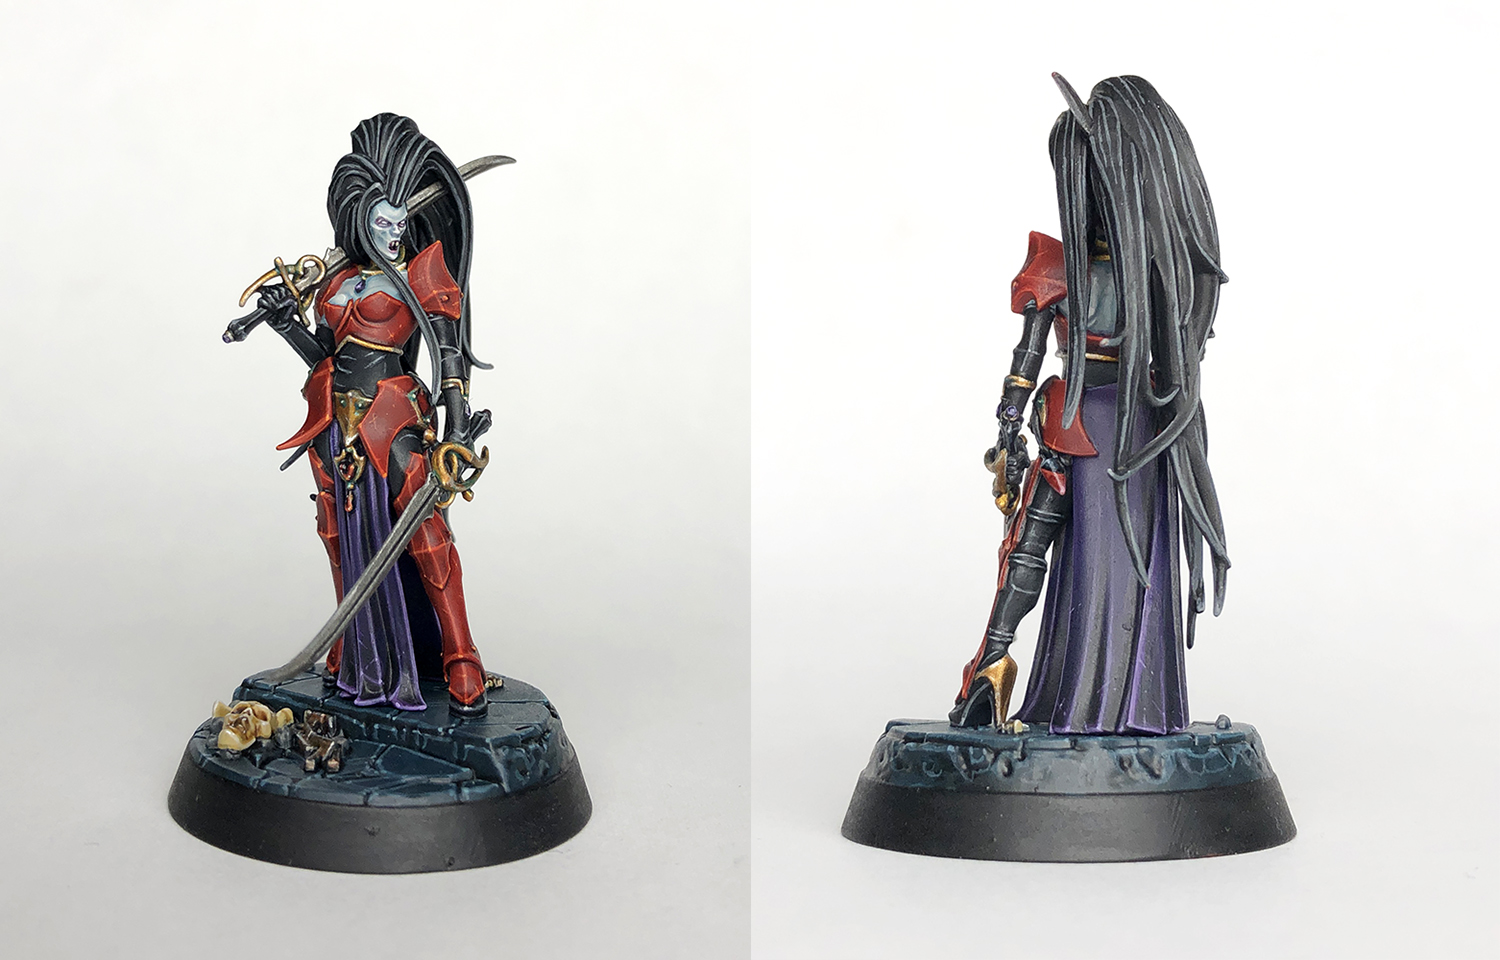
All of the silver areas, such as the sword and parts of the blood vial, were base coated with Leadbelcher. This was then given a wash of Nuln Oil. I tried to do some fancy gradients on his sword, but it's such a thin surface area you really can't tell in the end product. I didn't even attempt the gradient on the swords of Vellas von Faine. I did darken down the center line a bit more though with more Nuln Oil. I then finished it off with an edge highlight of Stormhost Silver. I wanted this metal to be cleaner looking than what I normally do on my undead.
The Gold

All of the gold areas were base coated with Retributor Armor and then given an all over wash of Agrax Earthshade. This was followed by an edge highlight of Liberator Gold. Finally, an even thinner edge highlight of Stormhost Silver was applied. At this step I also added some scratches to the parts on the armor. For a bit of weathering I made a mix of Caliban Green and Sotek Green and watered it down a ton. This was then applied to some of the rivets and other recess areas to make the gold look aged.
The Wings

Ennias Curse-born has a pair of wings that are unique to him. For the inside membrane of the wing I base coated it at the same time as the skin. It also received the same wash as the skin, and then got a second wash to darken it a bit more. At this point it differs a bit. First, I started to create a gradient towards a darker color at the top using Nuln Oil and Lahmian Medium. Do about two layers of this, getting more refined with each one. I then took a mix of Magos Purple and Contrast Medium and painted it all over the inner membrane. Once this was dry I did a second coat, but only towards the sides of each membrane, leaving the middle alone. I then did a few more layers of the Nuln Oil mixture toward the top, to darken it down a bit. Darken it to your tastes. I then highlighted the raised skin folds on the membrane with Grey Seer. Lastly, I took the Nuln Oil mixture again and made a mottled pattern near the top and sides of each membrane. This helps hide blends a bit more too. For the back of the membranes I base coated them with Corvus Black. I also used this color to help line the edges of the inner membranes at the same time. I then highlighted the back of the membranes with Mechanicus Standard Grey, followed by Dawnstone, then Grey Seer. This then got a glaze of the Magos Purple mix from the inner membranes to give it a slight purple tint. The black fade on the wing "arms" was done with a Black Templar/Contrast Medium mix and layered in a few steps to create a gradient.
Grey Hair

For Ennias I decided to go with grey hair instead of the black of the other two. I started out with a base coat of Dawnstone. This then got an all over wash of Nuln Oil. I then went back and relayered all of the strands with Dawnstone leaving the shade in the recesses. Touch up any of the recesses with Nuln Oil where needed. Next, I thinned down the Dawnstone a lot and used it as a glaze on the top third to half of the hair. Build this up over a few layers to get a gradient. In the end you want the recesses of the top half to be closer to Dawnstone. Then I went in with Grey Seer and highlighted the top half of the hair with it. You want this highlight to go down just a little bit past the gradient line from the Dawnstone glaze. Lastly, I picked out the top points of the hair with White Scar.
The Base

The stone of the base was base coated with Incubi Darkness. This then got an all over wash of Nuln Oil on the statue part and any rough rock areas. On the flagstone I only painted this into the recesses. Next, I touched it back up with Incubi Darkness. On the statue this was a bit more involved and was basically re-layering the color on, leaving the shade in the recesses. On the flagstone I did two highlight stages. First I mixed a little bit of Ulthuan Grey into the Incubi Darkness and picked out all of the edges. Then I added even more Ulthuan Grey and just added dots onto the corners of the flagstones. I used these same colors to highlight the statue, but did more of a gradual gradient, especially on the face, by watering it down more and doing successive glazes to get a smoother transition. I wanted the face on the statue to have softer transitions. The rocks on the base were painted with Mechanicus Standard Grey, washed Nuln Oil, then highlighted with Dawnstone followed by Karak Stone.

Vellas von Faine was painted in the same method with all of the same colors, as well the rest of the warband. Unfortunately I didn't have time to finish Gorath for this tutorial, but he will be painted exactly the same as the rest of them. I'll be sure to share pictures of him and the warband as a whole once they're done. I'm also looking forward to trying this scheme out on some of the new Soulblight models coming out, like the Blood Knights and the new Vampire Lord!
Until next time,
Tyler M.
No comments:
Post a Comment