

When I started painting my Arkanauts I knew I wanted a unique scheme that looked great on the table, but was fairly quick to paint. After a test model I had my colors sorted and painted the whole unit at once. Hopefully this step by step guide helps you out, even if you don't want your Overlord to come from Barak-Mor.
Metallics

Step 1.
All of the armor is base coated with Leadbelcher. I probably did about two thin coats of this.

Step 2.
I then gave the armor an all over wash of Nuln Oil mixed with a little bit of Lahmian Medium to make sure it flowed into the crevices and didn't pool.
Step 3.
Instead of highlighting the silver I then base coated the brass areas with Skullcrusher Brass. This meant their beards, any medallions on them, the edging on the axe hilts and the basket hilts on the swords, and a few areas on the guns.

Step 4.
This was then washed with Reikland Fleshshade. Be careful not to get this onto the silver at all.

Step 5.
The shafts of the axes as well as the handles of the guns and swords were painted with Balthasar Gold.

Step 6.
The Baltahsar Gold then got a wash of straight Nuln Oil.

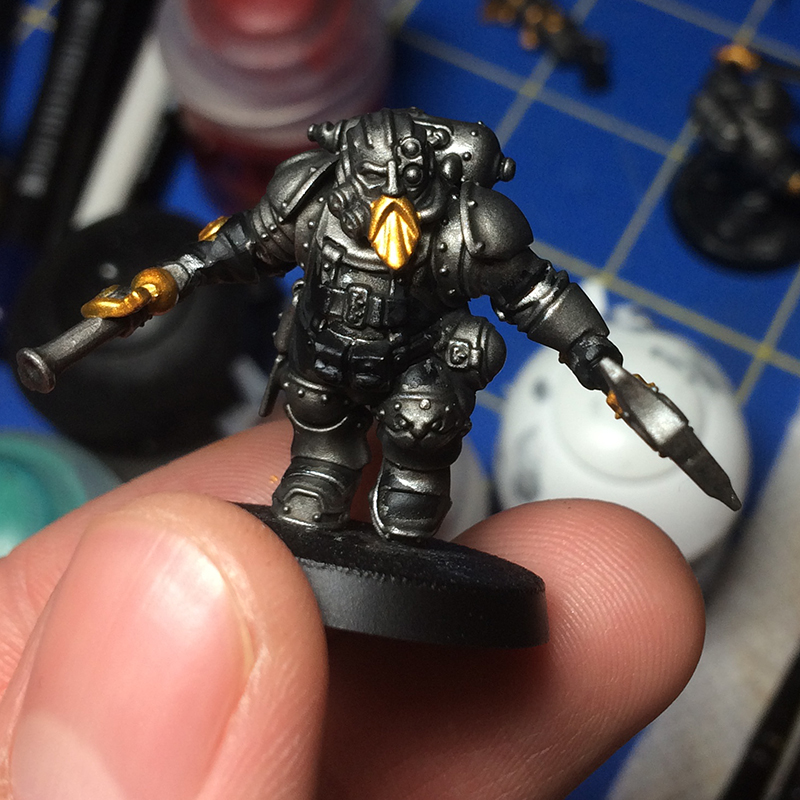
Step 7.
Finally, I highlighted all of the metal at once by using the Dry paint Necron Compound and lightly drybrushing all of the metallic areas. You don't really need to be too precise here since there are no other colors at the moment.

Step 8.
To finish off the armor and weapons I used a heavily watered down Skraag Brown to paint on rust. I focused this around the rivets and other divides in the armor. Be reserved with this. These are still duardin after all, they wouldn't let their equipment get too rusty. I did the same thing on the brass and Balthasar Gold areas with Nilahk Oxide.
Cloth

Step 1.
All of the cloth areas got a base coat of Incubi Darkness. This definitely took two to three coats. You want to be careful here and make sure you don't get any on the metallics. I also painted the circle on their shoulder in this same method at the same time.

Step 2.
I then washed all of the cloth with straight Nuln Oil.

Step 3.
Now, I started highlighting all of the green with Kabalite Green. I tried to just pick out the tops of folds and the edges of the cloth. You want these to be fairly thin, but a little thicker since we will be doing thinner highlights in a moment.

Step 4.
This was followed by thinner highlights of Syrabite Green.

Step 5.
I finished the green up with very selective highlights of Gauss Blaster Green, it's an Edge Paint. This is much brighter, so use it sparingly. I mostly just picked out corners and such, and you want to make these as thin as you possibly can.
Gloves and Boots

Steps 1 & 2.
I apparently forgot to take a picture here, but first you need to base coat all of the black areas with Abaddon Black. I painted the gloves and boots black, as well as a few tubes here and there. These areas were then edge highlighted with Dawnstone Grey.

Step 3.
I did a final, very selective highlight of Ulthuan Grey. Just like with the last step on the green, you want this highlight to be used sparingly. I mostly just picked out corners and areas I wanted to emphasize.
The Straps and Pouches

Step 1.
All of the straps and pouches, and such were base coated with Zandri Dust. This took about two or three coats to get a solid color on. This step will take awhile, so make sure you get all of the straps and take your time.

Step 2.
These then got a wash of Seraphim Sepia. Be careful to not overflow onto the other colors.

Step 3.
I then edge highlighted all of it with Ushabti Bone. This will take even longer than step one since the belt on them has four edges on it. Take your time here and try and maintain a really thin and straight line when highlighting.

Step 4.
Lastly, I went back and picked out all of the buckles and rivets on the straps and pouches with Leadbelcher and washed them with Nuln Oil. I also used this time to fix any mistakes on the other silver areas, such as accidental splotches of green or something.
The Gauges

Step 1.
They all have little pressure gauges on their power plant things. I painted the insides of all of these with White Scar.

Step 2.
I then picked out the "danger zone" with Mephiston Red. This area is actually sculpted into the gauge, so there's no freehanding involved.

Step 3.
I used a bit of Nuln Oil around the inside edge of the gauge, but don't flood it, you still want to be able to see the red and white. The pointed was picked out with Abaddon Black, and the outside edges of the gauge were tidied up with Leadbelcher.
The Eyes

Step 1.
Paint all of the eyes, lenses, and any areas you think would look good glowing on the power pack with White Scar.

Step 2 & 3
I then washed all of the lenses and glowing bits with Nihlahk Oxide. After this was dry I went back and repainted the eyes and lenses with pure white, making sure to leave a glow of the Oxide color around it.

Now you're done! I painted a little symbol I made up on the circle of their shoulder pad using Ushabti Bone, which you can paint any symbol you want on there. I think I am going to switch mine up between units to differentiate them.

My basing was done up so they look like they are in the Endless Deserts. This was done by gluing some sand on and base coating it with Tau Light Ochre. I then drybrushed it with Ushabti Bone and followed it up with a wash of Seraphim Sepia. At this point I painted the rocks Mournfang Brown and washed them with Agrax Earthshade. They then got a drybrush of a Mournfang Brown/Ushabti Bone mix, and then the whole base got a drybrush of Ushabti Bone to tie the rocks and sand together. To finish it off the rim of the base was painted black.
You can base your models however you want though. Barak-Mor is currently floating above the Endless Deserts, but they operate within the whole of Shyish, and of course, trade and pillage in the other Mortal Realms as well. So, really any basing scheme fits them.
Here's a list of every color used for easy reference if you want to replicate this scheme exactly:
- Leadbelcher
- Skullcrusher Brass
- Balthasar Gold
- Lahmian Medium
- Nuln Oil
- Reikland Fleshshade
- Necron Compound
- Skragg Brown
- Nihlahk Oxide
- Incubi Darkness
- Kabalite Green
- Syrabite Green
- Gauss Flayer Green
- Zandri Dust
- Seraphim Sepia
- White Scar
- Mephiston Red
- Abaddon Black
- Dawnstone Grey
- Ulthuan Grey
Until next time,
Tyler M.
No comments:
Post a Comment