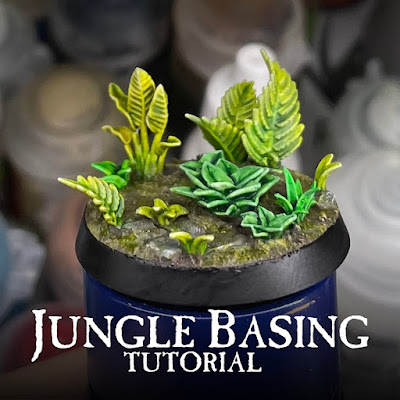
The Seraphon/Lizardmen have a very distinct look to them, part of which, for me anyway, is their jungle home. Whether it's in Lustria of the Old World or the wilds of the Mortal Realms, no bipedal lizard is complete without some tropical foliage on their base. Unfortunately, the typical basing solutions just don't cut it for me. A lot of the static grass and other solutions like that just don't look jungle-y enough for me. Luckily, I came across a company called Make It Epic basing, which does 3D prints for a bunch of different basing doodads, including a fairly large selection of jungle plants! They also sell these as either STLs if you already have a 3D printer yourself, or as pre-printed resin, for people like myself, who do not own a printer.
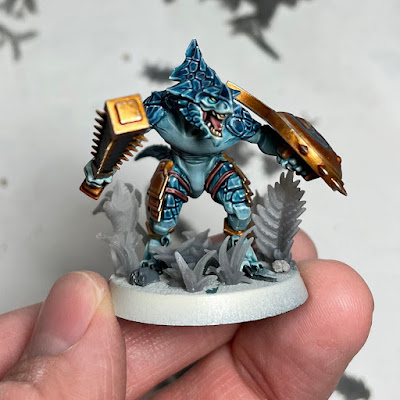
After a quick browse on their site I picked a selection of jungle plants I liked, as well as the ruined temple floor, which came out to around $50 total. As some of these plants are quite tall, I didn't glue anything to the base while painting the model. Instead, I lightly superglued one of the Seraphon's feet to the base to paint them, this will then allow me to gently snap it off later, and work on the base on its own.
Once the model was completely painted, I started by gluing some of the Ruined Temple bits to the base. I generally either did one piece of this, or at most, one larger piece like this and then maybe a single tile somewhere else on the base.
I then proceeded to fill in the rest of the base with a variety of the jungle plants. I tended to put some of the largest ones behind the mini so they didn't block the whole thing. I then started filling in from the middle of the base and working my way out. Don't be afraid to cut some of the taller jungle plants to be shorter if that works better for the model. I found I liked using the Grass Tufts and Groundcover a lot as they take up less vertical space. I think once I move onto some of the taller models, like the cavalry or the Kroxigors, I be able to play with the vertical space a bit more. I also glued on some random rocks, and some skulls as well.
I then snapped the model off the base. Be careful here as you don't want to break the plants or the model. I tried to leave a bit of space around each foot so it would be easier to do this, as in, no plants overhanging toes or directly against the foot. I then primed the bases with Wraithbone, and as you can see here, I started with the stones, giving them a quick and dirty coat of Mechanicus Standard Grey.
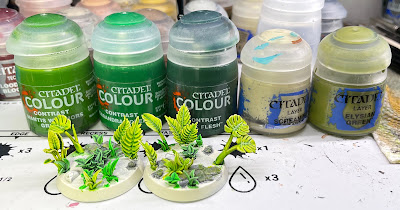
The plants were primarily painted with a couple of Contrast Paints. My main three colors were Mantis Warriors Green, Ork Flesh, and Karandras Green. I used Mantis Warrior for all the largest plants as I really liked the color, and then all 3 for the smaller ones, varying which plants got which color. I also went back with a mix of Ork Flesh and Contrast Medium on some of the larger plants and applied some into the deepest recesses and near the base of the plants to give them a bit more variation. Once this is all dry I gave the Mantis Warrior plants a light drybrush with Elysian Green, and then mixed some Screaming Skull into this and did some quick highlights on them. The Ork Flesh and Karandras Green plants were highlighted by mixing a bit of Screaming Skull into the respective Contrast Paint. I didn't spend a ton of time on the highlights. I also got some of these green paints onto the stones to give them an overgrown feeling. Just be random with it and thin it down. You don't want to overpower the grey, just add to it.
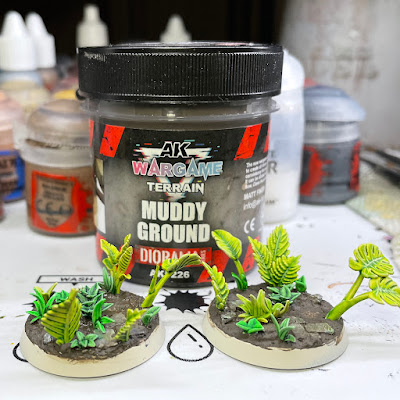
For the ground itself I used AK Muddy Ground, but you can really use whichever brown texture paint you want. You obviously want to be careful here as to avoid messing up all your work before. If you do get some on a plant I found if you're quick enough you can clean it up with a wet brush. I also thinned this down and got it between all the temple stones, and onto them a bit as well, but keep it thin for this. Where the feet of the model go you want to keep it flat with little to no texture so you'll be able to glue it back on again.
The ground was touched up with Dryad Bark anywhere it was too thin and you could see the primer through it. It was then drybrushed with Gorthor Brown, followed by Baneblade Brown. I then watered down some Elysian Green and did patches of green on it, followed by smaller patches of thinned Mantis Warrior Green. I just wanted to incorporate the ground into the plants a bit more and give it a mossy feel. The stones were given a quick light drybrush with Grey Seer.
With that I painted the skull and rimmed the bases black and they're done. Just carefully glue the models back on with superglue and you're ready to enact the Great Plan of the Old Ones! It's definitely a more involved process then the average base, but I really like they way they turned out. Since Seraphon are a fairly high points cost army, I won't be doing a horde's worth of these bases, so it's more manageable. Plus, it feels just like the artwork to me. Make It Epic basing has a ton more basing options too if you want to check them out, including a bunch of stuff that works great for the Deepkin!
Do you want to learn how I painted the Saurus Warriors themselves? Check out the step by step tutorial I did over on Goonhammer!
Until next time,
Tyler M.


No comments:
Post a Comment