

Today I have my second Masterclass Tutorial, this time focusing on Hrothgorn's Mantrappers from Warhammer Underworlds. This tutorial breaks down every color as well as the techniques used to bring them to life.
Like I mentioned in my Masterclass Tutorial for Rippa's Snarlfangs, these tutorials follow a different format than the step by steps you may be used to on the Warhammer Community site. Instead, they more closely follow the format of the old 'Eavy Metal tutorials from White Dwarf and require a bit more skill level to implement. I hope these will sit alongside my step by step tutorials nicely, complementing them.

When I sat down to think up a color scheme for Hrothgorn himself I knew I wanted something very cold. Something that really had a wintery feel to it. That's when I remembered an older model I painted almost a decade ago. It was just a random Reaper mini, but I've always really liked the color scheme. Sadly, I sold it a long time ago, but I still had plenty of pictures.
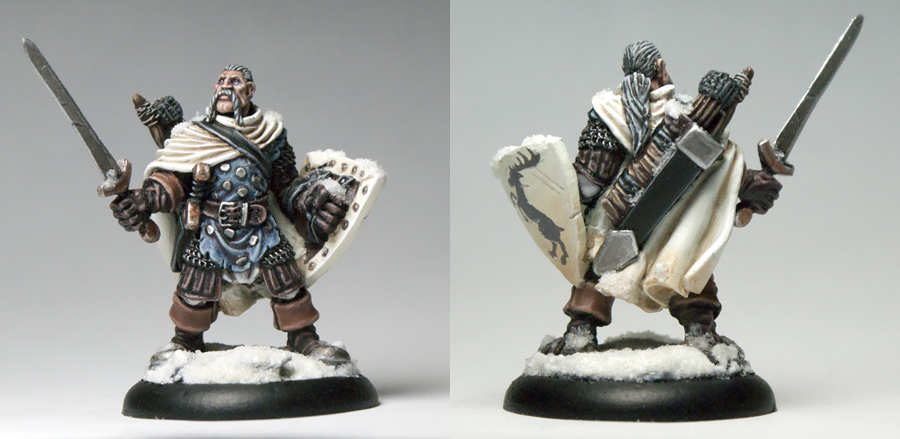
Something about the blue and cream with the warmer leathers and skin just looked really cool to me. I decided that I wanted to try and emulate this same color scheme onto Hrothgorn.

The Gnoblars would just follow the same scheme but with a darker, earthier green for their skin compared to the normal Grots.

The Frost Saber needed to further emphasize that cold look as well. With all this in mind I dove in, starting with the skin on Hrothgorn.

Hrothgorn's Skin
The entire warband was primed with Grey Seer to start with.
I wanted to give him a very pale skin tone to reflect that he's living in a snowy, cloud covered area most of the time. All of his skin was base coated with Flayed One Flesh. Once that was done I used a 50/50 mix of Guilliman Flesh and Contrast Medium, and painted it only into the areas I wanted shaded. This will save you time with cleaning up later. Areas like the hands and face were given more of an all over shade since there are so many crevices. Once this was dry I went in with a little Reikland Fleshshade and further darkened down a few of the crevices I really wanted to emphasize, such as areas on his face, fingers, and between his arms and body.
Next I went back with Flayed One Flesh and re-layered it onto the flatter areas and on the raised areas of his face. If you have this slightly watered down you can kind of glaze it over some of the shaded areas too if you want to create more subtle transitions. It still looked a little flat to me though, so I went back with Kislev Flesh mixed with Lahmian Medium and glazed it on the lower portions of some of his larger muscles to create a gradient. Before I started highlighting I went in with Carroburg Crimson mixed with water and glazed some red onto areas that would be more flushed. For my model I did this on his bottom lip, ears, knuckles, his nose, and any scratches on him. Less is more with this and it's better to do several thin glazes to build up the color to what you want instead of one glaze that ends up being too saturated. The eyes and eyelids also got a glaze of Druchii Violet.
Lastly I started the highlights with Pallid Wych Flesh. Keep this thin and pick out the edges of the raised areas. By keeping it thin we can build up the intensity over a few layers if we want. You also want to keep the width of the highlights pretty thin too. If any of them become too stark for you, go back and re-glaze the highlight with Flayed One Flesh to tone it back down. The last step is to mix some White Scar into this for the most prominent highlights on areas of his face and hands. You want to use these very sparingly. His eyes were then painted with white, making sure to leave a bit of the darker color showing around the rims, and dotted with Black Templar. This is a great color for dotting eyes since it flows off you brush easier. You just need to make sure you don't have too much on the brush or it can flood the eye.

The Beard
His beard was base coated with Stormvermin Fur. Next I layered Adminastratum Grey on it, following the strands of the hair, leaving the previous color showing in the recesses. Lastly, I mixed some White Scar in for the final highlights.

The Blue Cloth
Thunderhawk Blue has always been a favorite color of mine, but one I don't use very often. I felt like it would be the perfect color choice for this nomad of the Everwinter. All of the blue cloth areas are base coated with Thunderhawk Blue. I then used a roughly 40/60 mix of Gryph-Charger Grey and Contrast Medium and painted it into the recesses. I did multiple layers of this to build up the transition. I also used this as a light glaze on some of the flat areas such as the front of the knee to get a bit of a gradient. For highlights I mixed some Screaming Skull into the Thunderhawk Blue and did 3 layers of highlights, mixing more and more Screaming Skull in for each one. The first highlight mix was also used as a bit of glaze near his knee to get a transition from mid-tone to light. I kept these pretty thin and the final highlight is pretty much just a dot on the most prominent areas. These same colors were also used on the arrow fletching.

Dark Brown Leather
All of the areas that were going to be the dark brown leather were base coated with Rhinox Hide. These were then washed with Nuln Oil. I then went back and re-layered the Rhinox Hide on, leaving the Nuln Oil showing in the recesses and folds. The first highlight was applied somewhat thickly with Bloodreaver Flesh. You can start painting on the scratches and such now too. The second highlight followed the first, but thinner, using Knight-Questor Flesh. This was finished off with a final highlights of Knight-Questor Flesh mixed with Screaming Skull as dots on the most prominent areas.

The Fur Pelts
All of the fur pelt areas, such as on his back, around his boots, and on the one Gnoblar, were tidied back up with Grey Seer so I had a solid coat of that. They then received an all over shade of Apothecary White. Just make sure this doesn't pool too much in any one area. Next I used watered down Thunderhawk Blue mixed with a little bit of Apothecary White and picked out some of the deepest areas at random. To highlight it I simply painted White Scar on in three lines. One along either side of each fur tuft, and one down the middle. The fur on the Gnoblar was carefully drybrushed instead.

The Inside of the Pelt
For the tanned skin look of the inside of the pelt I did a base coat of Rakarth Flesh. This was then given an all over shade of Reikland Fleshshade mixed with some Lahmian Medium. I then built this up in several thin layers in areas, such as near the bottom of it, to get a bit of a gradient. Next I used thinned down Rakarth Flesh, and began building the color back up near the top, and also along the tops of creases. On the lightest areas this was used as bit of a glaze as well. You can also add nicks and scratches at this point. For the highlights I mixed Screaming Skull into the Rakarth Flesh and did it in two layers, adding more Screaming Skull in for the second highlight.

The Cream Cloth
All of the cream cloth areas were base coated with Wraithbone. These were then given an all over shade of a roughly 20/80 mix of Aggros Dunes and Contrast Medium. If the mix seems too dark just mix some more Contrast Medium into it. Build this up in a few thin layers, focusing more and more on the recesses of the folds. I then used a little bit of Agrax Earthshade to further define the darkest areas, such as separating the two pieces of cloth on the back or the holes. For highlights I went back over with the Wraithbone in thin coats where needed to even out areas and brighten it up a bit. I then mixed in White Scar for the highlights, doing two to three layers in thin lines, ending with pure White Scar on select areas.

The Wood
All of the wood areas on all of the models were base coated with Dryad Bark and then given a wash of Nuln Oil. Following the wood grain, I painted Gorthor Brown on, followed by Baneblade Brown, and lastly Rakarth Flesh on the lightest areas. Get more and more selective and refined with each highlight layer so you're not just covering up your previous work. You want to barely use Rakarth Flesh.

The Bone
All of the bone areas (except for any of the teeth in their own mouths) were base coated with Rakarth Flesh. These were then given an all over was of Seraphim Sepia. Next, Ushabti Bone was layered onto them, leaving the shaded areas showing in the recesses. On the teeth totems this was done in growth lines, basically painting lines from the base of the tooth towards the tip. Lastly, White Scar is used as the final edge highlight.

The Metallics
The iron areas of the model were base coated with Leadbelcher, with the brass areas getting a base coat of Balthasar Gold. Both of these were then shaded with Nuln Oil. The iron was then simply given an edge highlight of Stormhost Silver, with small nicks and scratches painted on. The brass areas were highlighted with a mix of Balthasar Gold and Stormhost Silver, with more Stormhost Silver mixed in for a second highlight that was only used on the outermost edges and corners. For a bit of weathering, heavily watered down Skragg Brown was painted onto the iron in patches. Be careful with this and build the color up in layers if you want a more intense rust effect. The brass got a similar treatment, but with watered down Nihilahk Oxide.

For the springs on the traps I painted a coat of Gore-Grunta Fur onto the ones on the Gnoblars and Cygor Brown on Hrothgorns. This went over top of the metallics already painted for them.

Gnoblar's Skin
For the Gnoblars' skin I knew I wanted to get a bit darker and more earthy compared to Rippa and his gang. To start with I base coated them with Deathworld Forest. Next, I used a 50/50 mix of Militarum Green and Contrast Medium, and painted it into the recesses of the skin, and pretty much all over the face. This is the same method we used on Hrothgorn, just different colors. Then I tidied up with Deathworld Forest where needed. For highlights I mixed Screaming Skull into the Deathworld Forest, and did it in three layers, mixing more and more Screaming Skull in with each one. The final highlight layers is really just a few dots on areas on his face, hands, and knees. The lip then got a glaze of a watered down Akhelian Green, while the eyes were picked out with Mephiston Red, followed by Wild Rider Red.

The Light Brown Leather
The lighter brown leather on all of the models was painted with a base coat of Mournfang Brown. This was then given an all over shade of a 50/50 mix of Cygor Brown and Contrast Medium. I followed this up by tidying up with Mournfang Brown where needed and also laying down the first highlights with it. I then did a second highlight by mixing in some Screaming Skull, and a third, more refined highlight with even more Screaming Skull.

The Stone
The stone areas were base coated with Dawnstone. These were then given an all over wash of Agrax Earthshade. I then went back with Dawnstone and re-layered them, leaving the shaded areas in the recesses. You can also thin this color down and use it as a glaze over some of the shaded areas to create gradients and variations in how dark things are. I then highlighted it with Adminastratum Grey, followed by a more refined highlight of Grey Seer.

The Wrappings
Any of the wrappings on the models were base coated with Rakarth Flesh and then washed with Agrax Earthshade. Next I re-layered Rakarth Flesh on the flats of the wrappings, and then did a final edge highlight of Pallid Wych Flesh. This is also how I painted the string on the crossbow.

The Frost Saber's Fur
The main fur on the Frost Saber was base coated with Grey Seer. I then used Apothecary White with a little Contrast Medium mixed in and picked out all of the recesses. I also coated the entire belly and bottom half of its legs with this, feathering it a bit near where I stoped so there wasn't a hard line. You can build this up over two layers to make it stronger. Next I mixed a little Thunderhawk Blue into the contrast paint and picked out all of the scratches on him, as well as some of the deeper recesses.
Next, I went back with the Grey Seer and redefined some of the muscles. You don't want to cover up everything you just did, just make sure the there is definition and a difference between the flat areas and the recesses. I also heavily watered it down at this stage, and used it as a bit of a glaze to help feather out the transition in areas like his side, where it goes from pure Grey Seer on top to the darker part on the bottom. Lastly, I used White Scar to highlight the edges of everything. If you water this down enough you can build this up over a few layers where needed to get some nice transitions and subtle highlights.

The Mane
For the Frost Saber's mane I played with either going dark, or cream like Hrothgorn's cloak. After painting little patches of both base coats I decided to go with the dark look. The mane was base coated with Stormvermin Fur. This was then given an all over shade of Nuln Oil. Once that was dry I went back with Stormvermin Fur and highlighted all of the raised hair. This then had Screaming Skull mixed in for two to three additional highlights, mixing more Screaming Skull in each time and focusing more towards the tips of the hair. I also painted the pattern on the Frost Saber's side coming down from his mane at this time. This was just done with a flat coat of Stormvermin Fur and left as that. I looked at the studio model for the pattern. If you thin your paint down a bit more than normal you'll have an easier time painting delicate patterns like this. You'll just need to do a few coats of it.

Face and Additional Details
To blend the mane in with the grey-blue fur I mixed some Lahmian Medium into the Stormvermin Fur until it was heavily diluted and then glazed around the edges of its face and also near its nose. Do this very thin and try not to leave any tide marks. I did multiple layers on the sides to build up the darkness of the color as it approached the mane. Tidy up with Grey Seer where needed, including glazing overtop near the transition line.
When I applied the Nuln Oil to the mane I also put a bit into its eyes to make them darker. I then painted the eyes white, and picked out the pupil with Sotek Green.
The nose and claws were both painted with Black Templar. Then I painted an edge highlight of Adminastratum Grey, followed by a smaller highlight of Grey Seer, and finally some reflection dots using White Scar.
Its bottom lip was painted with a few layers of Basilcanum Grey, but not the whole lip, just the part facing in. Sort of like its gums. Just think of how dogs' mouths are.
Lastly, the teeth were base coated with Ushabti Bone and then washed with Agrax Earthshade. This was re-layered with Ushabti, leaving the shade in the recesses, then highlighted with White Scar. The larger teeth were highlighted in a striped, growth pattern. All of the models in this warband had their teeth painted with these same colors.

The Mantrap's Teeth
These were base coated with Black Templar. You can use Abaddon Black if you want, but I just prefer Black Templar for how easy it flows off the brush. This was followed by a highlight of Stormvermin Fur painted in striations going towards the point of the tooth. This was followed by a second highlight mixing Screaming Skull in and painting closer towards the point. Lastly, I added a dot of White Scar to the tips. This same color combo, minus the last step, was used to paint any small ropes or straps on the model as well, such as those tied to the skulls and some on the Gnoblars.

The Bases
All of the bases were base coated with Grey Seer. These were then given an all over shade of a 10/90 mix of Tallasar Blue and Contrast Medium. You really want this to be super diluted. While this is still wet on the base I then painted on blotches of a 50/50 mix of Akhelian Green and Contrast Medium. It will blend in naturally to the other color if it's all still wet. This just breaks up the color a bit and add some more visual interest. Once this is completely dry I drybrushed the whole thing with Grey Seer and then again, lighter, with White Scar. On some of the larger rocks I also did some edge highlights of White Scar to really make them pop.
I wanted these to be snowy though, so I then used the Valhallan Blizzard texture paint and put on large clumps of it. I didn't want to cover the entire base, but I did want there to be a good amount as well as some snow drifts. You can also add this onto areas of the model where snow would accumulate. You can see some on his shoes and there is also a good amount on top of his fur cloak. Just make sure you have a very small amount on your brush and be very careful adding it on. You can always add on more if you want. Less is more with this though. After that was done I wanted some areas of finer snow, like on top of his head or other areas where a little snow would be. To do this I painted some Lahmian Medium onto those areas, then sprinkled some Woodland Scenics snow flock onto it. You can use any snow flock really. The Lahmian Medium will make it stick to the model if it's still wet. Again, less is more, but you can use your finger to remove any excess if you need to.

The Icicles
The icicles were the last thing I added. To make these, I took a spare flight stand I had from GW, the clear plastic sticks, and held it over a candle. You don't want to burn the plastic, just soften it enough that you can start to pull it apart. I held it with a pair of pliers on each end. Also, do this outside in case you accidentally burn it. No one likes burning plastic fumes in their house. Once I had pulled it apart so that there was a string of thin plastic between them I set it aside to harden for a minute. Then I cut off the part I wanted, where it starts to taper thinner, and carefully glued it to the area. Once it was glued in place I coated it and the area it's immediately attached to with several coats of Gloss Varnish.

With that the warband is done! It's a lot of steps, but it looks good in the end. I have to admit, I've gotten a little too use to painting models that are mostly one color like my Nurgle demons and Nighthaunt. Felt a bit odd having to use so many different colors. I hope this tutorial was helpful! Let me know in the comments if you have any suggestions.
Until next time,
Tyler M.
No comments:
Post a Comment