

Today I have the first of what I'm calling a Mengel Miniatures Masterclass tutorial, focusing on Rippa's Snarlfangs in this one. This isn't my normal step by step tutorial, and is structured more like the old 'Eavy Metal Masterclass articles from the White Dwarf of ages past. The techniques are a bit more advanced, but I go through every step and color that I use!
 |
| Not from the early 2000s, but close enough |
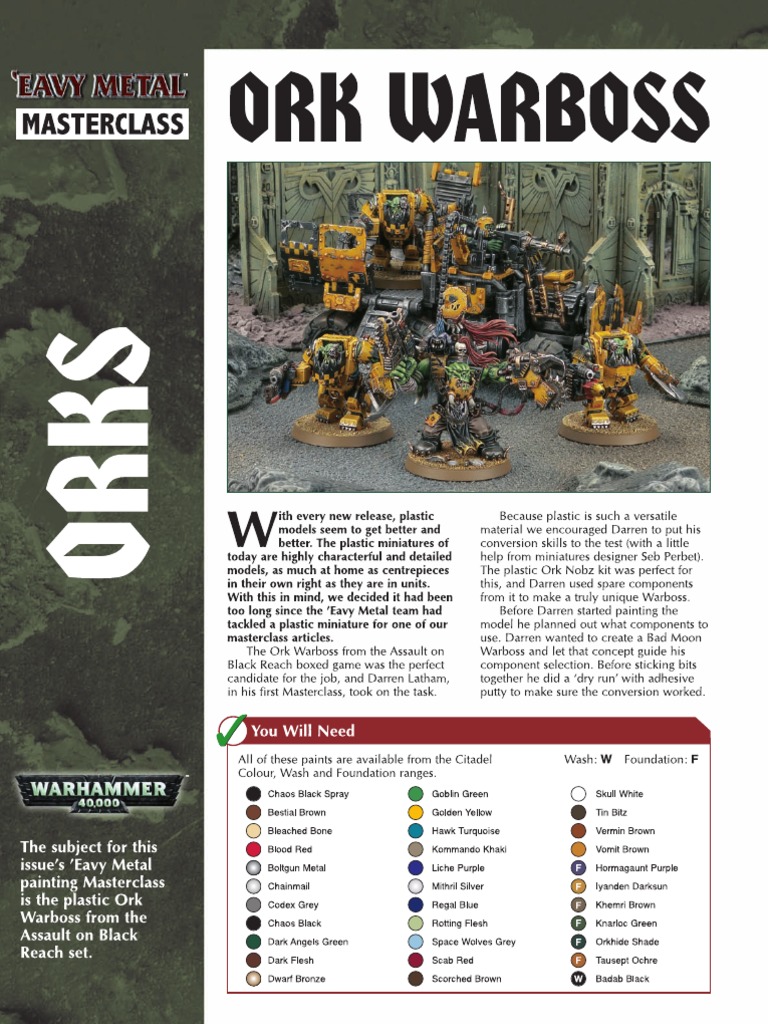
If you're like me and you grew up on the 'Eavy Metal Masterclass articles of the early 2000s, then you'll already be familiar with this format. There are only finished pictures of the model, not one at each stage. Which to be honest, would have been hard with this model as I did a lot of going back and forth. Once you start doing more blending things are rarely as straight forward as 1, 2, 3.

This tutorial is definitely a bit more advanced than most of my other ones, and requires a bit of painting knowledge beforehand. Some quick notes; when I mention feathering or blending, that's just me blending the color into the previous color to get a smooth transition between the two. Glazing is where I use a diluted version of a color to just tint an existing color or help smooth out a blend.

I really liked the Rippa's Snarlfangs models for Underworlds as soon as they were revealed. They're such a great update on a classic unit. I knew I wanted to paint these pretty standard as far as a color scheme went, and the 'Eavy Metal scheme was great anyway. My original idea was to do a quick job with Contrast Paint, but as I started on them I decided to go all out do a bunch of blending, glazes, and sharp highlights. I still used plenty of Contrast Paints though since they are great for blending and also for getting really saturated colors. I wanted this guy to be very vibrant.

I won't be replacing my step by step method with this newer version, don't worry. This Masterclass version will allow me to give you tutorials for stuff that I either didn't take step by step pictures for, or it was too hard to do step by step because of how much back and forth there was. Depending on how much people like this format I will try and do more in the future.

The Snarlfang's Fur
The model was primed with Grey Seer, which was also used as a basecoat.
The entire Snarlfang was then given an all over wash of a 50/50 mix of Basilicanum Grey and Contrast Medium. I did 2 - 3 more coats of this, but only focusing on the upper areas and rougher fur, making the area smaller with each layer to make a gradual blend of light to dark, with the darkest area being along the spine.
I then went in with Adminastratum Grey and painted the raised areas of the flatter fur, leaving the recesses shaded. I also left the areas closest to the rough fur alone and feathered the Adminastratum Grey into it by diluting it down with water a lot. This was roughly halfway up the torso. We're essentially continuing the gradient of dark to light.
I then did the same thing but with Grey Seer, and only focused on the lower portion of the legs, starting roughly around the knees, and feathered this into the Adminastratum above it. I also used Grey Seer as an edge highlight on the darker areas, but keep it thin, as well as picking out some of the rougher fur with it.
At this point I then used Dawnstone as a glaze on most of the shallower recesses to lighten the shadows a bit. Tidy up with the other two colors as needed. I also used this color to highlight some of the rough fur in the darkest areas.
Lastly, I used White Scar as a final edge highlight, mostly focusing on the Grey Seer areas, but also on some sharper edges and on the scars on the darker areas. Keep this as thin as possible. Paint the Snarlfang tail on the Grot's head in the same manner as the rough fur.

The Snarlfang's Head
The head was painted in much the same way as the rest of the body, but with more careful blending and feathering with the dark stripe going down its snout. The stripe was just from the original Basilicanum Grey layer from the start. The nose and claws were all basecoated with two coats of Black Templar. These were then edge highlighted with Adminastratum Grey. I then focused on the points more and used Grey Seer. Lastly, they got dots of White Scar.
The mouth was given a wash of a 50/50 mix of Volupus Pink and Contrast Medium. I then layered some Fulgrum Pink on top, leaving the other color in the recesses. Next I mixed Screaming Skull into it for two highlight layers. The teeth were painted Ushabti Bone, washed with Agrax Earthshade, tidied up with Ushabti, and highlighted with White Scar.
The eyes were painted White Scar, then dotted with Sotek Green.

The Leather
Next I moved onto the leather. I started with the lighter leather. This was basecoated with Balor Brown. Then it got an all over wash of a 50/50 mix of Aggros Dunes and Contrast Medium. I followed this up with two more washes, focusing on the bottom portion of it, creating a fade from light to dark. I then edge highlighted it with Balor Brown, followed by a finer highlight of Balor Brown and Screaming Skull. The last highlight was almost pure Screaming Skull on just the most prominent points.
The dark leather was basecoated with Rhinox Hide. This was given an all over wash of Nuln Oil. I followed this up by tidying up with Rhinox Hide in any areas I thought were too dark. The first edge highlight on this was Bloodreaver Flesh. Next, I did a thinner highlight of Knight Questor Flesh. The final highlight mixed Screaming Skull into Knight Questor Flesh for the most prominent areas. While highlighting these you can paint the little scratches on the leather as well, which is just done in the same way as the highlights.

The mid-tone leather was basecoated with Mournfang Brown. This was shaded in the same manner as the light leather, but with a 50/50 mix of Cygor Brown and Contrast Medium. I then highlighted it with Mournfang Brown, followed by Mournfang Brown and a little bit of Screaming Skull, and final highlight of even more Screaming Skull mixed in for the most prominent spots. All of the brown leathers then had Wyldwood mixed with a little Contrast Medium applied to the metal studs, and along any areas where the colors overlapped to help separate them a bit. You want to only paint this into exactly where you want it.
The black leather straps and the grot's pants were painted with a basecoat of two layers of Black Templar. These were then highlighted with Stormvermin Fur. The next highlight stage mixed some Screaming Skull into this.
The other light leather, used on one bag and the bedroll, was a basecoat of Zandri Dust. This was then shaded with Agrax Earthshade. After tidying back up with Zandri Dust, I mixed increasing amounts of Screaming Skull into the color for two highlight layers.

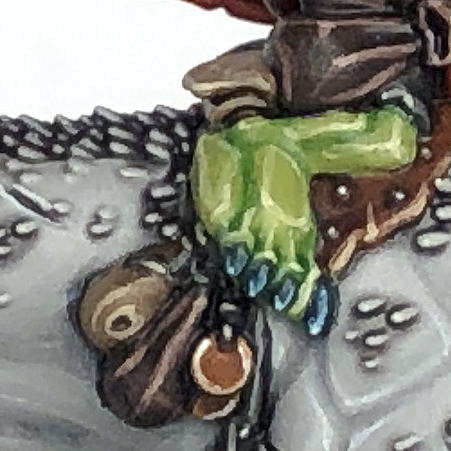
The Grot
With the majority of the Snarlfang out of the way I decided to paint the Grot next. All of the skin was basecoated with Elysian Green. I then did an all over wash of a 50/50 mix of Ork Flesh and Contrast Medium. Next, I tidied up with Elysian Green on the raised areas, you can also selectively darken a few more areas with Ork Flesh if you feel like it. For the highlights I mixed Screaming Skull into the Elysian Green and did three layers of highlights, mixing more Screaming Skull into each one. I made the Elysian Green into a glaze to soften some of the shadows and highlights in areas as well.
The bottom lip was given a glaze of a few layers of diluted Akhelian Green. I also painted the eye sockets with this color to help them stand out more later. The toe nails were painted with a 50/50 mix of Sotek Green and Abaddon Black, then highlighted with Sotek Green, followed by Sotek Green mixed with a little White Scar, and finally a dot of pure White Scar. The teeth were painted in the same manner as the Snarlfang's teeth.

The Wood
The wooden areas were basecoated with Dryad Bark. This was then layered with Gorthor Brown, leaving the Dryad Bark in the recesses. Next, I gave the whole thing a wash with a 50/50 mix of Wyldwood and Contrast Medium. I then highlighted it with Gorthor Brown again, followed by Baneblade Brown, and finally Rakarth Flesh, getting more refined with each color.

The Red and Metallics
All of the red areas were basecoated with Mephiston Red. They then received a wash with a 50/50 mix of Flesh Tearers Red and Contrast Medium. I did a second coat of this to create a blend towards a darker area on the bottom half of the shield and in some parts of the cloth coming off the bow. This was then all edge highlighted with Wild Rider Red, followed by a more refined highlight of Wild Rider Red mixed with a little Screaming Skull. You can also use the Flesh Tearers Red as a glaze where needed to tone down highlights. The eyes were painted in the same manner as the rest of the red.
The silver metallics were basecoated with Leadbelcher, while the gold was basecoated with Retributor Armor. Both of these colors were then given a wash of Agrax Earthshade followed by an edge highlight of Stormhost Silver.

The Bones
All of the bone areas were basecoated with Ushabti Bone. These were then washed with Seraphim Sepia and then tidied up with Ushabti Bone. On any larger, flatter areas, such as the forehead of the skull, you'll want to create a bit of a blend. These were then edge highlighted with White Scar. The darkest recesses, such as the eye sockets, got a little bit of Agrax Earthshade in them too. The strings were painted in the same manner as the black leather straps.

The Base
The dirt was done in the standard GW method of a Mournfang Brown basecoat, followed by a drybrush of Zemesei Desert and Ushabti Bone. The bones were done in the same was as on the model. The rocks were basecoated with Dawnstone, then washed with Agrax Earthshade. I then re-layered on the Dawnstone in thin layers to get a bit of a blend. I then did the same with Adminastratum Grey, but focused more on the edges and did and edge highlight too. The final edge highlight was with Grey Seer. To tie it into the dirt more, I did a wash of Mournfang Brown near the bottom of the rocks.

That's it, you're done! There are definitely a lot of steps and colors used in this (and a lot of mixing in Screaming Skull, I know), but it gets you a really smooth, and vibrant finish in the end. I really like using the Contrast Paints in this method. They're basically substituted in for a wash on a lot of the colors. It requires a bit more care, but you can finesse them a lot more, plus they are more vibrant. The rougher fur was barely touched with layer paints, which just shows how great Contrast Paints are on highly textured surfaces. So far I've only painted the one model from the unit, but I plan on finishing the other two to this standard as well. It does take a bit of time though, so I think I'm gonna do something faster as a palette cleanser, and then go back to these after that.
Let me know if you liked the Masterclass format and if you'd like to see more of these in the future.
Until next time,
Tyler M.
No comments:
Post a Comment