

The other week I had my unpainted Epidemius conversion to show off, well, now this week he's back in his fully painted glory! I'm really happy with how he turned out and I'll go over a bit of how I painted him as well as some issues that turned out to be great opportunities!

This guy has been quite the journey to complete. After fully finishing the conversion of the model, I went ahead and primed him to start painting. Everything was going fine until I primed the Nurglings that hold him up and disaster struck! The primer fuzzed plus it went on too thick in spots and basically ruined the model. Normally I could just strip the paint off, but I was out of Simple Green and right now is not a great time to find some spare cleaning supplies out at the store. After debating a few options, which included just trying to salvage the fuzzy model, I decided to build a new Nurgling pile. I still had half a Nurgling kit left, which was just enough to get the job done. The most challenging part was making sure the new pile lined up with his chair since I had already sculpted a hand onto it which needed to match up to the arm of a Nurgling. After some careful placement I got it to work and I think the new Nurgling pile turned out even better than the last! I was able to fit more Nurglings on it and make it look busier, plus I got more of the Nurglings to be interacting with the palanquin. I was able to salvage the scroll carrying Nurgling from the first build since the fuzz on him was pretty minor.

With that fixed it was off to painting. I had him in four subassemblies, Epidemius himself, the palanquin, the fly banner, and the Nurglings. I decided to start with Epidemius to get myself motivated. I mostly followed the guide for my Plaguebearers with a few modifications. I added in an extra highlight stage of Pallid Wych Flesh on some areas, like the face, and was more careful with my blends and highlights. I did have to mix up a correction color to tidy up in places, which is hard with all the drybrushing and washes. I used a mix of Zandri Dust, Ogryn Camo, and Seraphim Sepia, which mostly did the job. It was a little off but close enough that after some more shading and highlights you couldn't really tell where I had done it. The maggots were done with a basecoat of Kreig Khaki, shaded with Athonian Camoshade, and then highlighted with Pallid Wych Flesh. They also got a little bit of Nurgle's Rot once the model was all done.

The trickiest part about him was his scroll. It had some sculpted detail on it already, but the areas where I had to putty over the Tzeentch icons were flat. I knew I wanted the Nurgle symbol and a fly but not exactly sure how. I used Screamer Pink to paint this to tie it into the spot color of my army. I actually painted all of it, then went back and re-painted both the Nurgle symbol and the fly afterwards. At first I just did three circles for the symbol but decided three skulls would look better. To fill up most of the rest of the space I did tally marks. These ended up being seven long, which was just a fluke of how much space I had, but works perfectly for Nurgle. Of course they count in batches of seven!

After he was done I moved onto the chair. The Nurgling was first since he needed some messy drybrushing. After he was done I tackled the wood. I did a combo of how I painted the rest of the wood in my army and the method Darren Lathem used in his Nurgle Masterclass Video. I basecoated all of it with Dryad Bark, then gave it a heavy wash of Rhinox Hide. This was then highlighted up with Gorthor Brown and then further by mixing some Screaming Skull into it. For the green blotches I just followed what Darren did on his. The whole thing painted up pretty easily, though I did run into the issue of the paint rubbing off parts of the chair while painting it.

The cloth banner was done in the same way as the cloaks on my Chaos Warriors. The feather was another challenge. At first I was going to do it blue like with my Scrivener but then decided it drew too much attention to it. Then I went with the off white with the blue tip, but it ended up being too bright, once again drawing the eye too much. To darken it down I did a thin glaze of watered down Agrax Earthshade. At this point I also changed the frame of his abacus to the demon stone look I use on their swords. Originally it was just metal and blended in too much with the chair.

The Nurglings were the last thing I tackled on the model. They were painted in the same way as Epidemius, but a little quicker. Nurglings are a little tricky to paint when they're in a pile like this. You kind of just have to jab paint into the interior parts of it so you have some color there. Essentially the Nurglings on the interior are just a basecoat and a wash with maybe a highlight or two on the areas I could reach. The rest of them were pretty straightforward though, they just took a bit of time. Once I glued the palanquin on, there was a bit of a gap between the arm and the hand of the Nurgling near the back that's holding it, so I had to do a bit of filling with greenstuff and paint over it really quick.
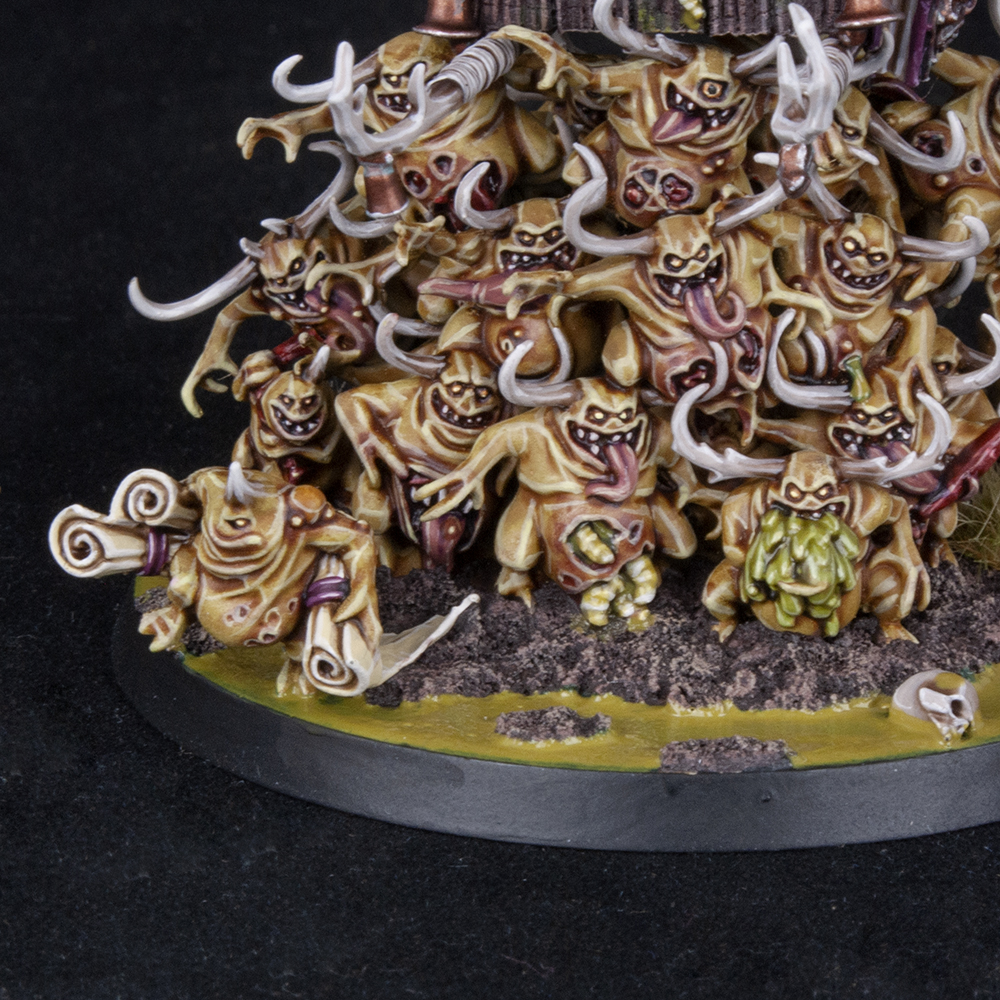
I spent a little more time on the Nurgling carrying the scrolls. I thought of him as the "hero" Nurgling. To tie him into the colors of the rest of the model a bit I painted the bindings on the scrolls with Screamer Pink. The vomit on the one Nurgling was fun to paint as well. It was done with Elysian Green as the base color, then shaded with Athonian Camoshade and highlighted up. The base on him was done the same as the rest of my Nurgle stuff. The mud was a little tricky since I had to get it between some of the Nurglings without getting it on them.

I'm really happy with how he turned out. Epidemius has been a favorite of mine since the character was first released. I've always liked Nurgle, and since he was the first named demon character to have a model he holds a special place in my heart. This model is definitely a bit fragile, but sturdy enough for gameplay, as long as he doesn't get knocked over. You can check out a 360 degree video of him below.
Until next time,
Tyler M.
No comments:
Post a Comment