
The Skin

Step 1.
To start off I base coated all of the skin with Fenrisian Grey. Technically you could (and probably should) base coat them first with The Fang and then Fenrisian Grey, but I skipped a step. It took a few coats to get a solid color, but since I was painting all six at the same time, once I finished the last one, the first one was ready for a second coat. Whichever way you do it, you want to have a nice solid coat of Fenrisian Grey on all of the skin before moving on.

Step 2.
All of the skin then got a wash of Dracanhof Nightshade mixed with Lahmian Medium. I would say it was close to a 50/50 mix. You just want the wash to primarily just flow into the crevices without darkening down the overall color too much.

Step 3.
Once that was all dry I went back with Fenrisian Grey and relayered the skin, making sure to leave the shade in the recesses. If you used enough Lahmian Medium in the previous step this shouldn't be too hard to do since the raised areas of the skin should still be fairly close to Fenrisian Grey in color.

Step 4.
Next I took Druchii Violet mixed with Lahmian Medium and started building up a gradual blend on the feet and in this guy's case, his head tentacles. I built this up over several layers, making sure to concentrate it more and more on the feet and the end of the tentacles. This way it gets darker and more purple the further away from the Tzaangor's main body you get.

Step 5.
I then used Fenrisian Grey to add the first highlights onto the purple areas. I picked out all of the ridges, and in the case of the tentacles I painted a single line on each side going down its length. Carry this highlight into the areas that are still a blue/grey. You won't be able to see this highlight once you are off of the purple areas, but it will help with looking like there is a gradual color transition.

Step 6.
Using a mix of Fenrisian Grey and Screaming Skull, probably about 50/50, I highlighted all of the skin on the model. I picked out muscle ridges, bony areas, etc. Basically anything that I thought needed emphasizing and made sense to have a highlight on. You want to do this step on the purple areas as well, but be a little more selective with it then we were in the last step.
The Beak

Step 1.
I decided to make the beak on my guys black since I thought it would look more sinister. To make the transition gradual since there isn't really a hard line of where the beak starts, I used Nuln Oil in exactly the same way we used the Druchii Violet earlier on the skin. I built up the transition gradually over a few layers, focusing more and more on the tip of the beak.

Step 2.
I then highlighted the beak using the same mix of Fenrisian Grey and Screaming Skull that we used in step six of the skin. There are a few ridges you will want to pick out as well as the edges.
The Armor

Step 1.
All of the armor panels are base coated with Abaddon Black.

Step 2.
I then line highlighted it with The Fang to help tie it into the overall blue color scheme of the model. Since a lot of these armor panels have trim, leaving you no edges to highlight with The Fang. Instead you have to highlight just inside of the trim, leaving a slight black line between the highlight and the trim. I just do this in a few select areas.

Step 3.
Lastly I did a very small refined highlight of Fenrisian Grey on the sharpest points of the last highlight.
The Cloth

Step 1.
The loin cloth area was base coated with Ulthuan Grey. This took a few layers to get a solid coat. It's a fairly small area though so it shouldn't take too many.

Step 2.
Next I shaded the recesses with some watered down The Fang. Instead of just slathering this all over the loin cloth I carefully painted it into the folds. After this was done I tidied up a tiny bit with Ulthuan Grey, but if you're careful with the shade you won't need to do much of this.

Step 3.
With that done I highlighted the edges of the folds with white.
The Gold

Step 1.
All of the gold areas were base coated with a solid coat of Retributor Armor.

Step 2.
Next I shaded them all with a wash of Reikland Fleshshade. Some of the gold banding is flat and has no detail so these areas didn't get a shade. On the larger flat gold areas I did put a little of the shade down though so that it will have some color variation once I highlight it.

Step 3.
After that was done I line highlighted all of the gold with Stormhost Silver. This is one of the new metallic colors from GW and it works great. Expect a more in depth review of it soon.
The Silver

Step 1.
All of the silver areas, such as the weapon blades and the chains got a base coat of Leadbelcher.

Step 2.
These were then washed with Drakenhof Nightshade to give them a slightly blue tint, once again to tie them into the Tzeentch theme of the colors. This also gives them a bit of a magical look.

Step 3.
This was then all line highlighted with Stormhost Silver, just like the gold. I also took this as an opportunity to base coat all of the areas that will be gems with Stormhost Silver. This will act as the under layer for the gem paint we use later.
The Fur/Hair

Step 1.
All of the hair and fur areas were base coated with Screamer Pink. This particular Tzaangor doesn't have much on him, just a bit on his chest and shoulders, but the other two have more. I also decided to paint the feather hanging from his belt in the same color to save time.

Step 2.
All of this was then highlighted with Emperor's Children just picking out the individual hairs and feather bits.
The Horns/Bone/Marble

Step 1.
I base coated all of the bone areas as well as the weapon handles with Rakarth Flesh. I decided to paint the weapon handles as marble, so this help's lighten it for the next step.

Step 2.
Next I painted over top of all the bone areas with Ushabti Bone, and the handles with pure White. You want a nice solid, even coat of these colors.

Step 3.
The bone areas then got a wash of Seraphim Sepia, which I didn't water down very much at all. I wanted the color to be pretty strong. The handles got a very watered down wash of Agrax Earthshade since I wanted to mostly retain the white color.

Step 4.
All of the bone then got a highlight of Screaming Skull. On the horns this meant picking out all of the ridges. You may notice that I didn't bother highlighting the very tips of the horn, which is because we are about to darken those done in two steps.

Step 5.
This was all followed with a select highlight of pure White. On the horns this meant mostly just picking out the edges. The weapon handles also got highlighted at this point by picking out the raised areas.

Step 6.
Next I darkened down the tips of the horns and the beak of the bird skull on his belt. I did this by using several thin layers of Agrax Earthshade, I believe about three. Each successive layer was started further and further up the horn. This way you build up a gradual blending of the bone color into the dark brown. After those three layers I did a layer of Nuln Oil near the very tip for the darkest point and finished it all up with a watered down glaze of Agrax over the whole blend to smooth it out. The blend should only come about half way down the horns.
I also took this opportunity to paint the veins onto the marble using Agrax Earthshade.

Step 7.
Lastly I highlighted the veins in the marble by painting a line of white underneath them. Normally I wouldn't do this, but due to the texture of the weapon handles the veins needed a little help standing out.
The Leather Straps/Eyes

Step 1.
Paint all of the leather straps and the eyes black. I decided to go with something more bovine for the eyes instead of the typical glowing evil look.

Step 2.
I then highlighted the straps with Dawnstone Grey and dotted the eyes with white. I didn't dot them like a pupil, instead like a reflection on a gem or lense, so near the back of the eye.
The Gems

Step 1.
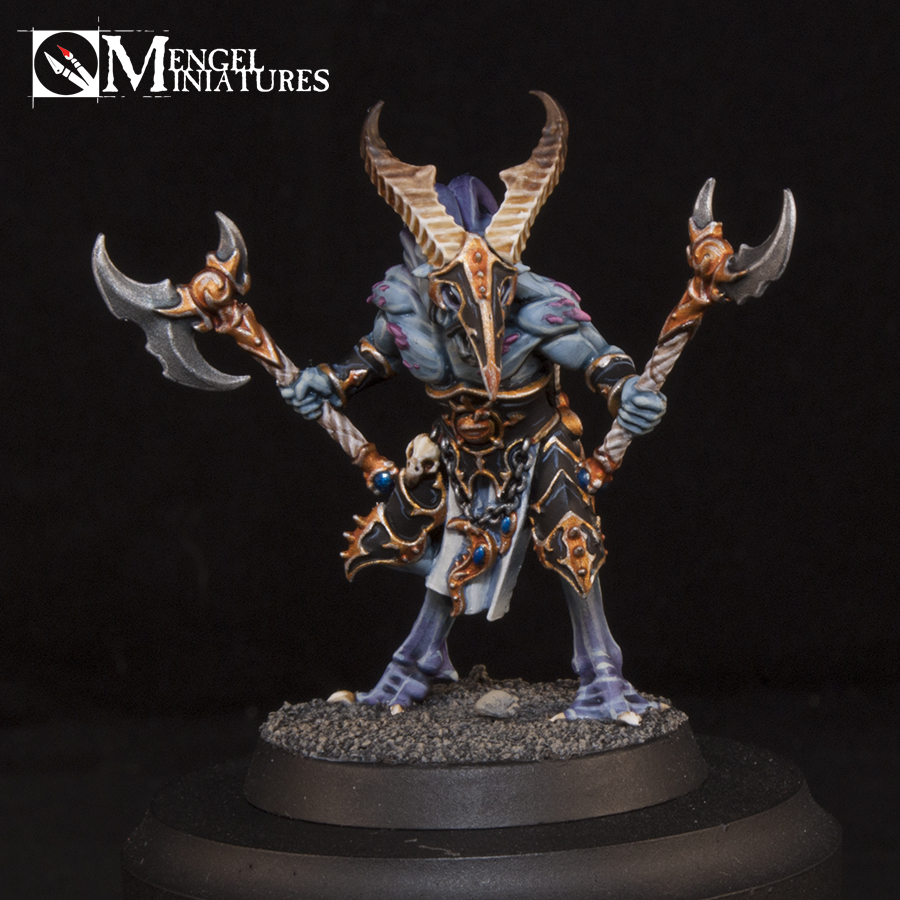
Back when I painted the silver I base coated all of the gems with Stormhost Silver. Now all I had to do was paint them with the new gem paint Soulstone Blue. You may notice that the base is done in this picture, that's because I seal all of my models with dullcoat. Since I want the gems to be shiny I had to finish everything else, seal it, then paint the gems.

That's it, your Tzaangor is done! This guy was a lot of fun to paint but took a little longer then I expected, mostly due to all of the gold trim.

If you use this guide on your one denizens of the Silver Tower I would love to see them in the comments below.
Until next time,
Tyler M.
No comments:
Post a Comment