
Out of all of the items used in this tutorial, I think the ePVC was the most expensive for me to buy, but the good thing is you'll use it across several projects before you run out. The same goes for the pine bark (which came in a very large bag) and the cork. Spread out across a bunch of projects, the individual cost of each one is pretty low.


Step 1.
I grabbed a sheet of ePVC, which is what I used to make Epidemius' throne, and drew an uneven, natural looking swamp shape on it. I used ePVC because it's rigid and won't warp over time like foam core will, but can still be cut and trimmed with a hobby knife as opposed to using something heavy duty like wood.
Step 2.
I then cut this out using a heavy duty hobby knife. Take your time and make sure you have a cutting mat underneath it.
Step 3.
Next, I used the same knife to bevel the edges of it so that it will blend into the table more. This was then given a quick sanding with sandpaper to smooth out the cut edges a bit. You don't need to be a perfectionist here since it will be getting covered with sand anyway.
Step 4.
To build up the lip of the swamp I decided to use some cork board. This is cheap and easy to cut, or even break apart with your hands. I used several left over pieces instead of a fresh piece. Place the piece where you want it, then flip the whole thing over and trace around the ePVC.
Step 5.
This was then cut down to size using a hobby knife.
Step 6.
Do the same thing with more cork until you have some going all the way around the outside of the swamp. I then simply broke off the interior of each piece with my hands until it was as thin as I wanted.
Step 7.
I was originally going to put a tree in one of the corners, so I cut out a section from the cork board for it, but decided against it in the end. Instead I decided to later place a rock there. Objects like this help break up the uniformity of the swamp.
Step 8.
I then carefully used my hobby knife and beveled both sides of the cork, the outside and the interior, so that it forms a little hill. On the outside you want to try and match this to the bevel on the ePVC.
Step 9.
At this point I glued all of the cork down. I also used little bits of cork to fill any gaps. Remember, this is all going to be covered with sand, so you won't notice things like this in the end. I also glued down my "rock" which is actually a piece of Pine Bark
Step 10.
Now it's time to add some character to the swamp itself. I first used these on my Nurgle display board for bubbles in the swamp, they're simply some buttons from a craft store. Nice and cheap!
Step 11.
Using some clippers I snipped the bottom of it flat. These were pretty easy to do. I then glued them down with some super glue.
Step 12.
To add a bit more of a Nurgle flavor too it I added some spare tentacles from the Beast of Nurgle kit. If you've purchased one of these, then you'll know that you'll have plenty of spare pieces left over. I also added a maggot pile from the Plaguebearers kit, and some bone piles from the Bonereapers Nexus kit. Basically, just raid your bits box for ideas, but try not to go to over the top with it.
Step 13.
Now it's time to smooth out some of the joins. For this I used fast drying filler.
Step 14.
Using a palette knife, I smeared this over the cork and blended it into the ePVC, surrounding cork, and the pine bark. Just be careful not to get any on the bits we glued down, or into the center of the swamp.
Step 15.
I followed this up by using some PVA glue to glue down a bunch of sand. Basically cover everything that isn't the swamp itself, the rock, and the bits.
Step 16.
One this was dry I heavily watered down the glue until it was almost water, then coated everything with it. This will help keep the sand on more, plus protect things like the pine back. I left it to dry on the tub of filler so the edges weren't touching anything. I didn't want to run the risk of it getting glued to the table when it dried.
Step 17.
Now it's ready for paint! I didn't prime mine at all, and just started painting right on it. If this was plastic scenery I would still prime it. For stuff like this I like to use a little bit cheaper of paints. I bought some acrylic paints from a local craft store. Don't go bottom of the barrel in terms of quality, but you definitely don't need the best stuff either. For the ground and rock I pretty much just followed the guide for my swamp bases, but used similar colors from the cheaper acrylics instead.
Step 18.
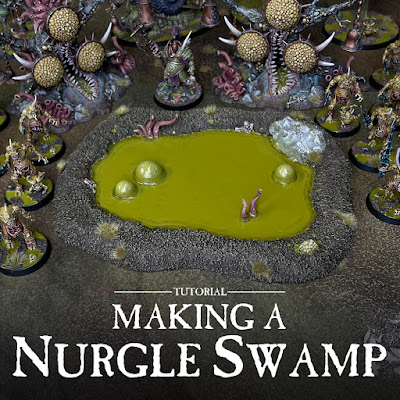
I painted the interior of the swamp a mid-tone green that felt appropriately swampy. This is just a base coat for the next step, though if you wanted a darker swamp you could stop here and gloss varnish it to get a wet look. For the tentacles and skulls I followed my Feculent Gnarlmaw guide. Once they were done I used about 2/3s of a pot of Nurgle's Rot and covered everything that's the swamp itself. The bubbles and a few other spots needed a second coat, but if you put it on thick enough, one coat works. This was mostly painted on by loading up my brushing and dabbing it on to avoid brush strokes. To add a bit of definition once the first layer of Nurgle's Rot was done I mixed some Athonian Camoshade into Nurgle's Rot and painted it around the edges of the swamp and the bubbles, and then mixed some Kreig Khaki into the Nurgle's Rot and painted on as a highlight for the bubbles. The shaded areas then got a thin coat of pure Nurgle's Rot back over them to add a shiny look back.
Once everything was painted I stuck on some grass tufts and it was all done! I also added a few splotches of Nurgle's Rot up on the ground and other areas, just to show it's a bit messy. I think for future swamps I will add more things to vary them up, like a tree, or some skulls floating in the swamp.
I'm really happy with how it came out. It was pretty easy to make and paint, and fairly cheap too. I think the most expensive part of this project would be needing a pot of Nurgle's Rot per swamp more or less. Coupled with my Feculent Gnarlmaws I can really make it look like Nurgle's Garden is coming into the Mortal Realms. This would even work for 40k too!
Until next time,
Tyler M.
No comments:
Post a Comment