

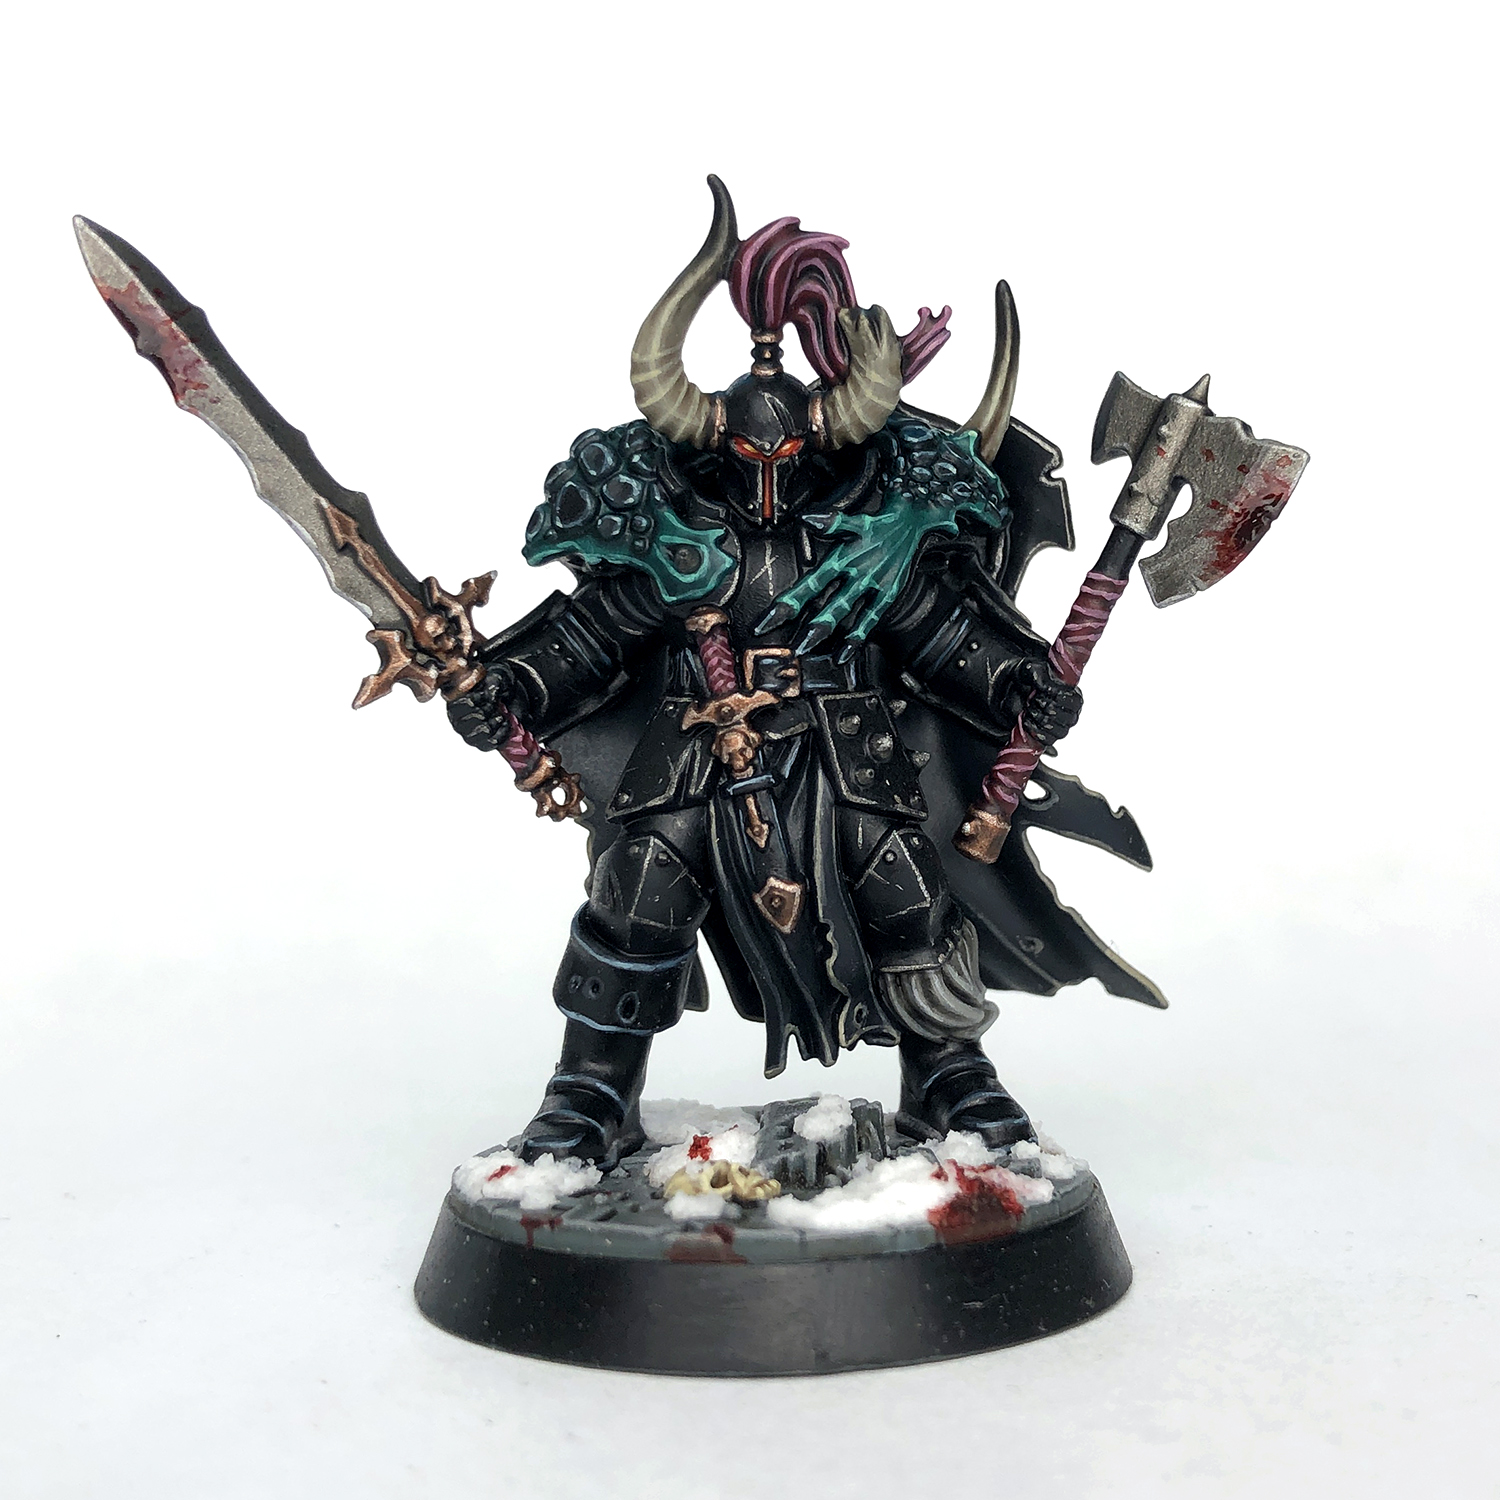

The Armor
The entire model was primed with Chaos Black since black was going to be the main color. Even though the primer is black, you still need to base coat all of the armor and leather with Abaddon Black since it's a slightly different shade and finish. Once I had a solid coat of this, I went in with Leadbelcher and picked out all of the edges of the armor. This is to show the metal getting worn down. You can be a little uneven with this. Leave gaps in a line, or have it be a little blotchy. This will further reinforce the weathered look. After I had picked out the edges I went back and added some more scratches and nicks with Leadbelcher. Focus these on areas that would get the most wear and tear, but make them random and relatively small. Remember, less is more. You can always go back and add more later. With that, the armor is done.

The Leather
The leather should already be base coated with Abaddon Black from the last step. I started to edge highlight it with a 50/50 mix of Abaddon Black and Thunderhawk Blue. This was followed by a more refined highlight of just Thunderhawk Blue. Lastly, I picked out some of the most prominent areas with a mix of Thunderhawk Blue with a little Ulthuan Grey added in. Keep this reserved mostly for corners and points.

The Cloth
To help differentiate the cloth from the rest of the black on the model I base coated it with Corvus Black. This color is slightly lighter than Abaddon Black. This was then shaded with Black Templar with a little Lahmian Medium mixed in. I just painted this right into the folds and built up the darkness of it over a few layers. You can always go back and touch up the cloth with Corvus Black if it got too dark in areas. The first highlight was done with Stormvermin Fur. I picked out the edges and the tops of any folds. Keep this thin, but out of all of the highlights, you can be the thickest with this. This was followed by a more refined highlight of a 50/50 mix of Stormvermin Fur and Karak Stone. Lastly, I used pure Karak Stone to pick out the most prominent corners and edges.

The Fur
The fur on his one boot was base coated with Stormvermin Fur. This was then highlighted by mixing in Grey Seer and picking out the raised parts of the strands. I did 2-3 highlights of this, mixing in more Grey Seer and focusing more towards the bottom. Once that was done I painted some Nuln Oil in around the top of the fur.

The Lizard Hide
All of the skin areas on this were base coated with Kabalite Green. Once that was dry it got an all over wash of Coellia Greenshade. I then started edge highlighting it with a mix of Kabalite Green and Screaming Skull. For the second and final highlight I just mixed in more Screaming Skull. For the scales I base coated all of them with Abaddon Black. If a little bit of the Kabalite shows through that's not a huge deal as it will make them look more natural. These were then edge highlighted with Incubi Darkness. This was followed by a more refined highlight of Incubi Darkness with a little bit of Screaming Skull mixed in. Keep it more on the dark side still. The final highlight just mixes in more Screaming Skull and is used to just dot the corners of the scales.

The Red
Both the wrappings on the weapons and the hair crest on the helmet were base coated with Khorne Red. This then received an all over wash of Nuln Oil. To highlight it, you guessed it, I mixed in some Screaming Skull to the Khorne Red. The final highlight just mixed in more Screaming Skull. On the wrapping these highlights just picked out the edges of the wrappings. On the hair it was picking out the tops of the hair strands, but also involved painting a few lines on some of the flatter areas to look like hair strands.

The Horns
I wanted the horns to be dark, but still have a bone look to them. To achieve this I base coated them with a mix of Stormvermin Fur and Ushabti Bone. It was probably about a 50/50 mix. Once I had a solid coat of this I did an all over wash of a 50/50 mix of Agrax Earthshade and Lahmian Medium. This was followed by a second wash of the same mix, but focusing on only the bottom half of each horn. To highlight them I took the base coat mix and mixed in more Ushabti Bone. I used this to pick out the ridges as well as along the edges running up the horn. I did around 2-3 highlights of this, adding in more Ushabti Bone and being more selective with it each time. Once that was done I decided to darken down the tips. Using a 50/50 mix of Nuln Oil and Lahmian Medium I painted the upper third of each horn, and feathered out the bottom of this area into the rest of the horn. Basically you don't want to have a hard line where the black stops. I built this up over a few layers, focusing more and more towards the tip of the horn each time so you get a gradual gradient. I used some pure Abaddon Black to pick out the very tips of them.

The Weapons
Both the ax and the sword were base coated with Leadbelcher, washed with Nuln Oil, and edge highlighted with Stormhost Silver. Simple and quick, but it works.

The Bronze
The bronze detailing on the model was base coated with Balthasar Gold. This was then washed with Nuln Oil. To highlight it I made a mix of Balthasar Gold and Stormhost Silver and picked out the edges. This was followed by a second highlight with more Stormhost Silver mixed in which was used to pick out the corners.

The Glowing Eyes
I decided I wanted this guy to have glowing, molten eyes. To get the effect I painted the entire inside of his visor with Mephiston Red. This included his eyes as well as the central slit. I then went in with Fire Dragon Bright and painted inside this area, leaving a little bit of red showing around the edges. The eyes were then picked out with Yriel Yellow, with a little in the central line as well. Lastly, I used pure White to pick out the eyes. These are sculpted onto the model, so it's a little easier to pick them out. I had to go in with some black and touch up around the edges of this as well. I used this same method on the runes on his shield.

The Base
I had primed the base with Mechanicum Standard Grey. This was then washed with Agrax Earthshade. Once dry, I drybrushed the whole thing with Dawnstone. This was followed by mixing a little bit of Grey Seer into the Dawnstone. For the dirt patches I base coated them with Mournfang Brown. These were then drybrushed with Zemesi Desert, followed by Screaming Skull. The skull was base coated with Ushabti Bone, and the shaded with Agrax Earthshade, cleaned up with Ushabti, then highlighted with Screaming Skull. Once this was all done I added some patches of Valhallan Blizzard.

The Blood
For the blood splatters on his weapons and the base I first used some watered down Flesh Tearers Red. I then used undiluted Flesh Tearers Red inside of this, so it gets more intense towards the center of the splatter. Next, I mixed some Rhinox Hide into this, and focused even more towards the center. This was followed by almost pure Rhinox Hide in the center. On the weapons this is focused towards the cutting edge of the blade. This is to show the blood getting thicker and more concentrated towards the source of the splatter. The blood on the weapons were then glazed with Carroburg Crimson and then given a coat of 'Ardcoat.
While this tutorial only covers Cragan, most of these techniques can be applied to the rest of the warband, and Slaves to Darkness armies in general. The only elements not covered on Cragan would be the skin hide on the shoulders of Razek, the flesh tones on Khagra and Zarshia, and the magical effects on Zarshia. The magical flames would probably be done using the same colors as the eyes though to tie it all together. Once I have these done I will post some quick tutorials on them to round out the warband. If you have any questions about how anything was done, just let me know in the comments below.
Until next time,
Tyler M.
No comments:
Post a Comment