
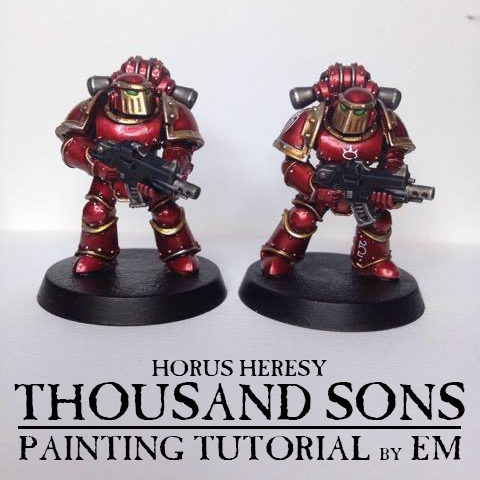
Today I have a very special guest post be non other than Em, who you may know from Warhammer TV, Twitter, or just her awesome minis she posts online! In this tutorial she walks us through step by step on how to achieve that metallic red look for the Heresy era Thousand Sons without using an airbrush.
Em: First of all, hello, I'm Em, I love blending and all things Tzeentch! I've been painting miniatures for 3 to 4 years now but first got interested in the hobby around 12 years ago when I was 13. I re-discovered the hobby a couple of years ago when I got a part-time job in a GW whilst at university. Since then I've played in tournaments and really dived in and found a new love where painting is concerned; I worked for Warhammer TV for around a year in the YouTube tutorials with Duncan :) I don't work there anymore but now make a living as a partnered Creative streamer on Twitch (I paint minis there) and as a commission painter! Enough about me though, let's get down to business!
Since the release of the Burning of Prospero set I have seen a lot of painters posting 30k Thousand Sons painted in their iconic metallic red scheme, however, a lot of the time I found that not owning an airbrush limited me in achieving this finish. :(
I knew that this scheme was relatively easy with a clear paint such as a Tamiya clear red and an airbrush, but I didn't really want to buy an airbrush just for this and having experimented with clear paints like that before with a brush, I found that it was sometimes difficult to achieve a consistent finish. So after talking to some of my friends in the community about their schemes for painting metallic red, I dedicated a stream to attempting to concoct my own recipe for achieving metallic red with a brush and the Citadel paints I already have.

Method

Step 1.
Spray the model with Retributor Armour spray (I usually prime black before this).

Step 2.
Drybrush all over with Liberator Armour.

Step 3.
Drybrush with Stormhost Silver focusing on edges.

Step 4.
Mix 50/50 Carroburg Crimson & Spiritstone Red and thin with water to the consistency just a little thicker than a normal shade and apply all over. Do this all in one go to avoid tide marks.

Step 5.
When last layer is completely dry, repeat the last step and apply a 2nd 50/50 Carroburg Crimson and Spiritstone red mix thinned with water.

Step 6.
When last layer is completely dry, repeat the last step and apply a 3rd 50/50 Carroburg Crimson and Spiritstone red mix thinned with water. This many thin layers are needed to avoid tackiness in the paint yet still achieve a solid appearance.

Step 7.
Thin some Carroburg Crimson down with water (around a 50/50 mix) and apply all over. This will mattify the red but don't worry!

Step 8.
When the last step is dry apply Bloodletter Glaze all over, making sure it doesn't collect too much in the reccesses.

Step 9.
Basecoat the gold (Retributor Armour), silver parts (Leadbelcher) and black parts (Abaddon Black) taking care not to get onto the red armour. Lenses were painted with Warpstone Green.

Step 10.
Shade all the details. Gold was shaded with Agrax Earthshade, silver and lenses with Nuln Oil.
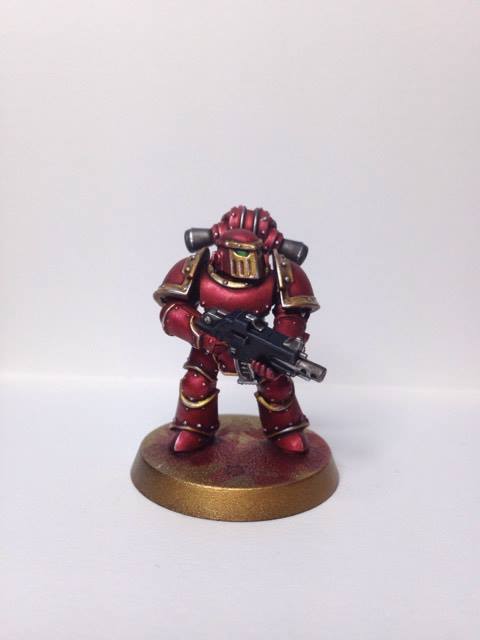
Step 11.
Add a layer of Auric Armour Gold to the gold and then highlight both the gold and silver with Stormhost Silver. Highlight the black with Eshin Grey and the lenses with Warstone Glow and then Moot Green. Also, paint all of the rivets on the armour with Stormhost Silver.

Step 12.
Thin 'ardcoat 50/50 with clean water and apply all over red armour. This will deepen the red and also ready the surface for transfers! Apply transfers as needed and seal them with a little more thinned down 'ardcoat. Base as needed!
I had a lot of fun creating this scheme and was pleasantly pleased with the outcome! If you don't want the finished marine to look quite as shiny, you can always leave the last step of 'ardcoat and finish at step 11 :) (just remember to matte down your transfers after applying with Lahmium Medium if you do this!).
It looks like a fair amount of steps and layers, but they are quick and easy to apply and if you are working with a batch it works well! If not, a hairdryer is great to speed up the drying process. I have never really needed/wanted an airbrush since starting the hobby and I didn't want to buy one just to achieve this scheme. I hope this is useful and that yours turn out great! Happy hobbying!
If you want to see more of my painting and come chat, I live stream my mini painting on Twitch here three times a week. I also post about my current hobby process on various social media:
Facebook (where I originally posted this tutorial)
-Em
Tyler: I'd like to thank Em again for taking the time to share this on Mengel Miniatures, I really like the look of her finished Thousand Sons and the ease of which it is achieved really appealed to me. Like she already said, you can follow her at any of the above links, and I highly recommend you do, she's always posting cool things (like this tutorial!).
Until next time,
Tyler M.
No comments:
Post a Comment