

It's not often that I have a reason to do such an elaborate conversion outside of a competition. This Black Templar Marshall (or captain) is a commission I picked up recently and it really let me flex my sculpting muscles.
When I was given the commission the guidelines were simple. I was provided with the old metal Vanguard Veteran Sergeant, a new head, shoulder pad, and sword to use and told to sculpt on a cape similar to the Sword Brethren models. When I looked at the model a few things stood out to me that I know I would have to change.

Since this guy wasn't going to have a jump pack I figured it would be best to remove him from his pile of rubble he's leaping on. That meant sculpting him a new foot. Originally I was going to sculpt the new foot entirely from scratch, but after a few frustrating attempts where the model would fall of the pin I had used to attach him to the base and squish all my work I changed approaches. Searching through my bits box (which includes heaps of Space Marines after years of collecting) I found a model I had already borrowed some parts from. Since I wasn't going to be able to use it anyway, I borrowed another part, the tip of his right foot. I glued it on to the metal model at the angle I wanted, pinned him to the base and quickly sculpted the rock he is stepping on as well as the gap between the two foot parts.

The next thing I noticed were the jump pack cables going across his chest. Without his jump pack it would look a little silly. Luckily Black Templars are big fans of tabards, so after discussing it with the client I chopped off the cables and started sculpting. The top portion was done all in one go and I am fairly happy with how it turned out. I have found that the key to a convincing sculpt, regardless of whether it's cloth or not, are sharp edges.

Clearly the more gentle folds wouldn't have sharp edges, but the "lip" of the collar would, so I spent a good amount of time making small adjustments to it as it dried to get it just right. I did the lower part in three stages. First I did the main shape with the folds near the crotch. Once that was dry I extended it a bit to be longer and did a few more folds near the center of it. The last step was to extend the fold all the way to the bottom and sharpen up the corners. Most of this was done on different days so there was plenty of time to dry in between.

Replacing the head and shoulder pad were pretty straight forward thankfully, since the arms were separate pieces. I did have to re-sculpt the back collar near the head though, but it is a fairly basic shape. During once of these sculpting sessions I had some leftover greenstuff so I decided to ad a laurel to his helmet. It only took my a few minutes per side and I think it really helps reinforce the Templar feel.

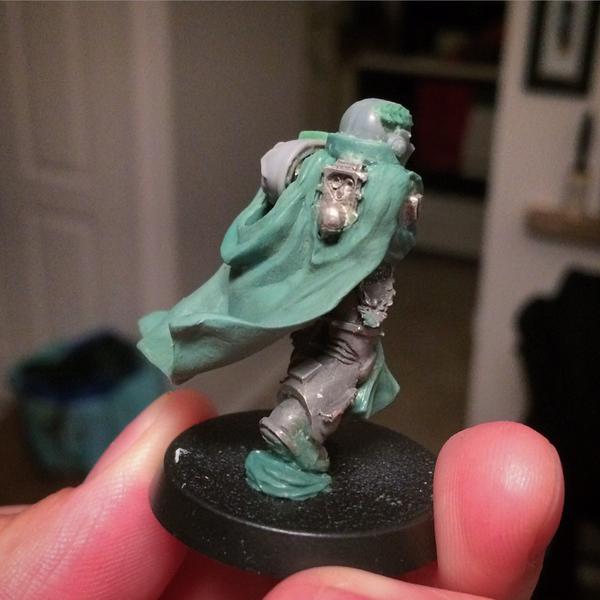
The hardest part by far was the cape. I have never sculpted a cape before, and this one had to have motion in it too! I first made the basic shape with a flat piece of greenstuff before attaching it to the model. The Sword Brethren cape also attaches to the front of one of the shoulder guards.

Once it was on the model I teased it into shape and then used poster tac to help hold its shape while it dried. All I did was stick clumps of it between the model's base and the underside of the cloak. I had to make sure I put them in the right places though, since they more or less determined the shape of the folds. I did have to check on it a few times during the initial stages of drying, since it will want to droop, but after a certain stage I was able to leave it alone.

Once that was completely dry I started adding the detail to it in the form of more folds. I stuck even more poster tac underneath it so I could press down on the cape while sculpting without breaking it off the model. I did the detail in four stages. I started near the dip where it's going between the shoulder and the back since it was the most interesting and would also have the most folds. After the first session about half the cape was done.

The next day I did the folds on the other half as well as adding a few more to the first half. The third session saw me sharpening up the corners and during the fourth and final session I filled in a few gaps on the underside. I also gave the whole thing several coats of extremely thinned down Liquid Greenstuff. This helped cover the few remaining fingerprints in the putty as well as blend all of the sculpting together. The final bit of detail on the model was to ad a heraldry shield to his shoulder to act as a brooch for the cape and hold it in place.
I really like how the cape turned out and it's much more dynamic then I was even originally hoping for. I'm really starting to like sculpting, from this cape, to my chariot's constructs, to my 100% scratch sculpted Squig. I have even started sculpting something else that I hope will be the start of something big, you may have seen my post a teaser on Twitter awhile ago.

This guy is ready for painting now and I hope to start on him next week. Now for a bit of self promotion. Remember, I do take commissions (like this model I'm showing off!), so if your interested you can contact me at tylerm@mengelminiatures.com. You can get an idea of my pricing with my pricing guide up near the top of my site, but every project is different, so contact me for a concrete quote on what ever you are thinking of getting done.
Until next time,
Tyler M.
No comments:
Post a Comment