

The other week I went over how I painted my Ironjawz test model. This week I have a step by step tutorial on how to paint a Nighthaunt Cairn Wraith which can be used for any ghostly model.
I went and picked up a Wraith to test this scheme out since they are fairly cheap. My goal was to do this as quick as possible and still have it look good. I want to be able to do a full 1,000 point army before Adepticon, but I still need to finish my Necrosphinx for my Tomb Kings for the Singles Tournament too, as well as a few other Tomb King models and also fit in holidays and a vacation. So my painting time before the end of March is at a premium. With that in mind I set off to see how long this would take.
Ghost Body

Step 1.
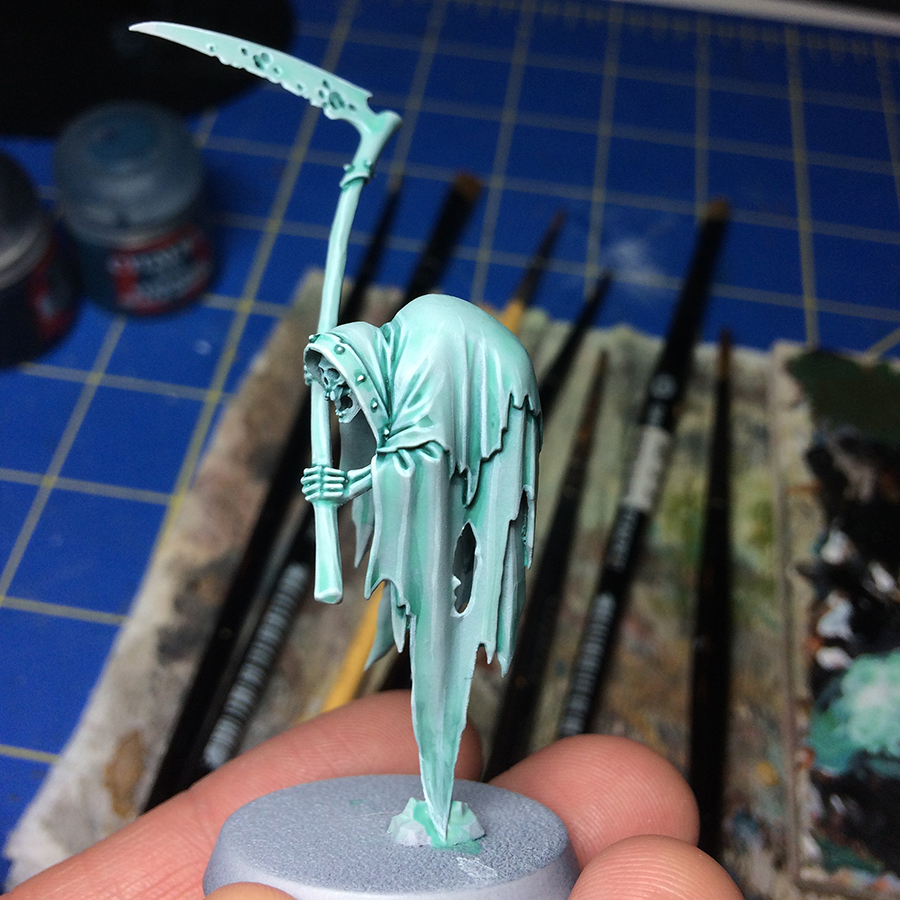
The model is primed with Corax White. Be sure to get a good coat of this on the model so no plastic is showing through, but do several thin coats if you need to instead of one thick coat.

Step 2.
The whole model got a wash of Nihilakh Oxide mixed with Lahmian Medium. I would say the mix was about 40/60 at the least. You really want to have a ton of Lahmian Medium in this so that it flows easily and doesn't make the model too dark. Watch out for the mix to pool in weird ways as it's drying.

Step 3.
I then used Coelia Greenshade to add a bit more depth to the mini. I mostly focused it around hard edged, so one the bone areas and were the two pieces of cloth on him are separated. I also used it in the bottom halves of some of the deeper folds. Be sure to mix a bit of Lahmian Medium into this too so we don't get any tide marks when it dries.
Step 4.
Lastly I highlighted the tops of all of the folds and all of the edges with White Scar. Don't go overboard with this and try and keep your highlights as thin as you can. Your mini should still be fairly light if you kept the Nihilakh Oxide wash thin enough.
Everything Else

Step 1.
After this was all done I decided to make the scythe less ghostly. I painted the haft with Abaddon Black and the blade with Leadbelcher.

Step 2.
The blade was then shaded with Agrax Earthshade. I didn't dilute this at all.

Step 3.
The haft was then highlighted with Eshin Grey. I picked out the ridges sculpted along it

Step 4.
The haft was then highlighted again with Dawnstone and after that I decided it was still too dark so I mixed in some white and highlighted it a third time. In the future I will probably just do Adminastratum Grey and maybe leave you the Eshin Grey step on non character models. The blade was edge highlighted with Stormhost Silver. I also painted on little scratches to give it some character.

Step 5.
At that point I thought I was done but I still wasn't happy with it. The scythe looked too distinct from the rest of the mini, it just didn't gel well to me. The first think I did was use some Skrag Brown to add rust to the blade. I watered this down a lot and painted it into the corroded areas and also in random pools.

Step 6.
The last thing I did was use some Nihilakh Oxide on the haft. Originally this was supposed to be a glow effect from the body and hands, and it still kind of is, but I also ended up making it look like the scythe was more ghostly where he was holding it, which I really like. I did this by thinning down some Nihilakh Oxide a lot and painting it on in a bunch of thin layers. I did more and more layers as I got closer to the hands and added in some white for right next to the hands. I kind of feathered the Oxide color out down the haft too as it was still wet to help the transition. Lastly I went over the highlights on the haft with Nihilakh Oxide to tie the colors back into the main body more. I don't know the exact number of layers I did here, I just kept adding more till I was happy with it. The trick is to go very thin and build up the color gradually.
The Base

I struggled with what to do with the base for awhile, but after listening to Josh Reynolds' Hunt for Nagash audio series again I was truck with inspiration. There is a part about the city of Helstone where it talks about amethyst crystals suffused with the magic of Shyish. This seemed suitably high fantasy for AoS and something I hadn't done before. After searching around on the internet for a bit I found the perfect solution. Originally I was going to paint the crystals, but I thought, wouldn't it be cool if I could use actual clear purple crystals? Luckily I found some great ones at Revivified Games on eBay. There were two sizes, larger and smaller, which I have mixed together on the base above. He has a bunch of other colored crystals as well, and I got some clear ones too which I may use on some Tzeentch minis in the future. You can also follow him on Twitter. The second part of the plan was to have a bunch of bones scattered around the base. For this I turned to Toad Kings Castings and their awesome looking Skull and Bones Scatter kit. Unfortunately it looks like my order may have been lost in the mail. For the moment I have moved ahead with just one skull on the base, but once my order gets in I will be using it on the rest of the army and sprucing up this base a bit more, so expect an update on it! I used some of the GW Astrogranite texture paint, shaded it with Nuln Oil then drybrushed it with Dawnstone Grey followed by Karak Stone and that was that. I really think the inclusion of the bone scatter later on will help balance out the colors on the base.

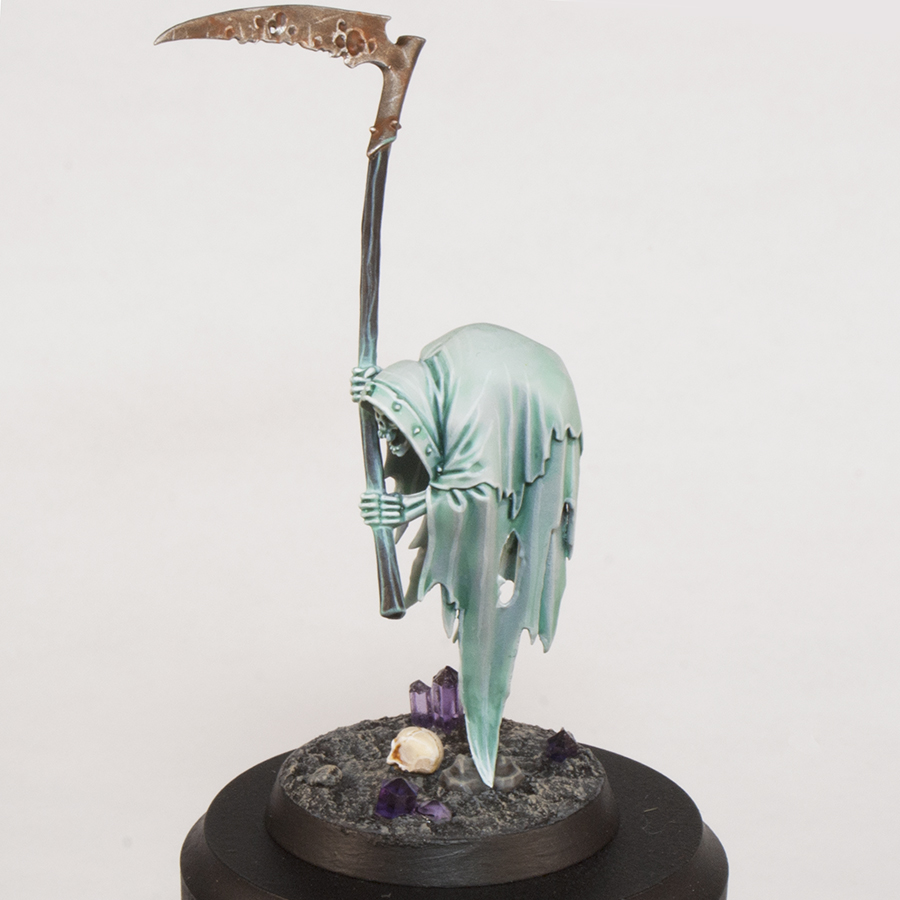


I decided to shoot this guy against a white background, which is something I usually don't do, but I wanted to show off the crystals which got a bit lost against the black.

Here's one against black though, so let me know which set looks better for future pictures of the army.
You can check out a 360º video of the model below:
Until next time,
Tyler M.
No comments:
Post a Comment