

I approached painting this model with the objective of doing the quickest, and easiest techniques I could think of while still maintaining a high level of quality. I'm happy with how it came out, and since I was doing a few new techniques on it I made sure to document the whole process.
I would say this model took a total of around 4 - 6 hours to paint, not including drying time. It works great for either the Khorne Bloodbound or the Everchosen's forces and is pretty easy to do too!
Black Armor

Step 1.
The model was base coated with Abaddon Black over top of the black primer. This is incase I need to do any touch ups later on. The primer and Abaddon Black are slightly different shades of black. After this I did line highlights along the edges of the armor with Runefang Steel. I made sure to make the highlights slightly irregularly shaped and also broke them up a bit, so there are gaps in the line. This helps reinforce the idea that this is the metal showing through the black paint.
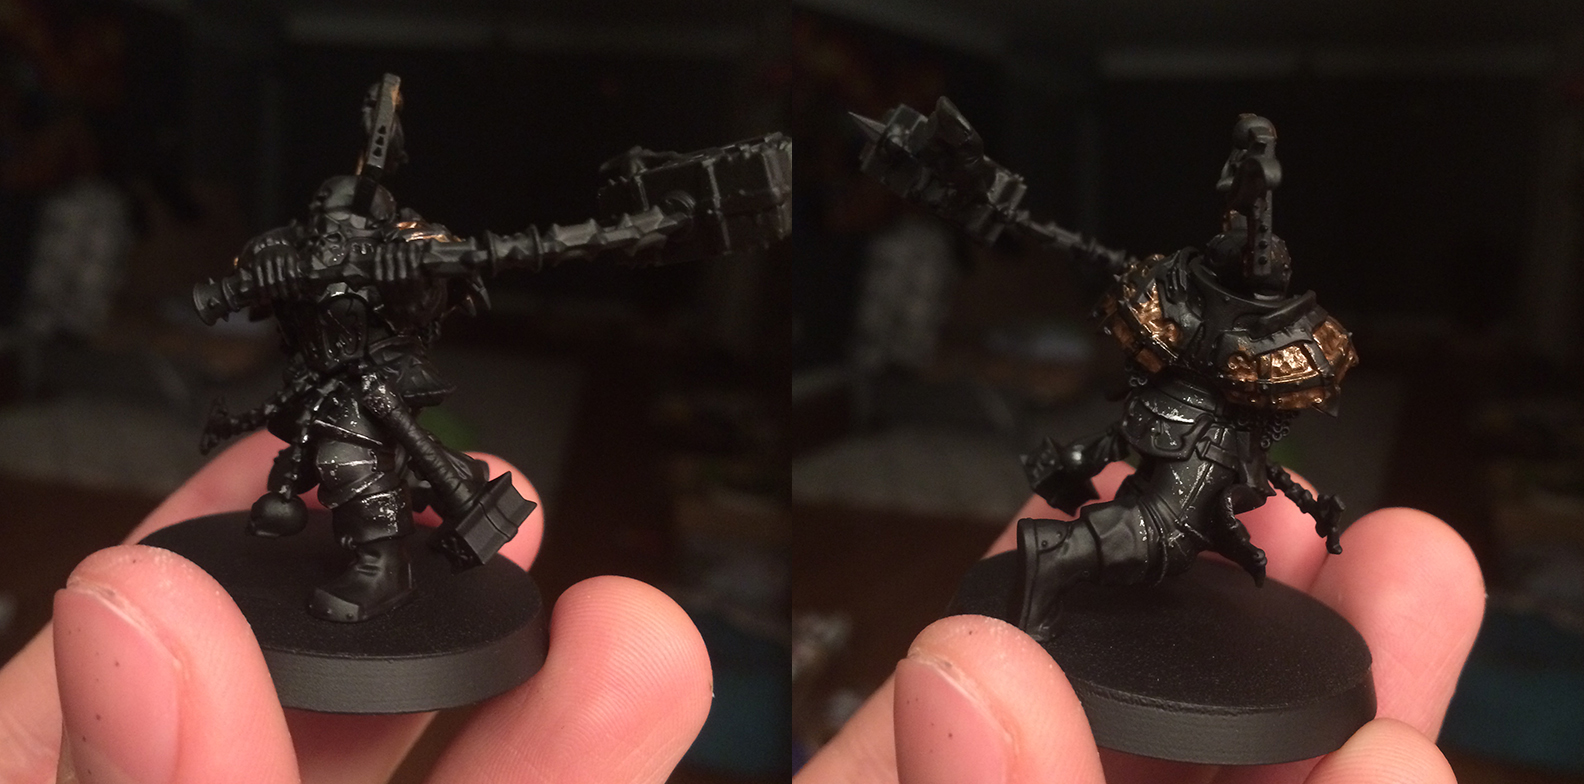
Step 2.
I then took a piece of foam from a carrying case and used to apply more random battle damage. I simply got a little bit of Runefang Steel on one of the ends, blotched a bit of it off, and then carefully blotched it onto the model in areas that would see a lot of wear and tear. I then went back in with a brush and made some diagonal slashes here and there and connected a few of the smaller blobs into larger blobs. That's it for the black armor.
Brass and Gold

Step 1.
You could see in the previous step that I base coated all of the areas I want to be brass with Balthasar Gold. I then drybrushed these areas with a Runefang Steel/Balathasar Gold mix.

Step 2.
All of the areas that were going to be gold were base coated with Retributor Armor. This part takes awhile since there is so much thin trim. You need to be careful not to get this on the already finished black armor or onto the brass areas.

Step 3.
I then washed all of the brass and gold with Agrax Earthshade. The brass got 2 - 3 layers of wash, allowing time in between to dry, to make it the darkness that I wanted. I also hit key areas of the gold with a second layer of wash, mostly around rivets, to further define it.

Step 4.
All of the gold areas got a line highlight of Liberator Gold. I also used some Nihilakh Oxide on the brass areas, being careful not to overdo it. You still want it to look like brass, so keep the Oxide concentrated near the crevices. I did a second layer of the Oxide in select parts to further emphasize it.

Step 5.
I did a final highlight of pure Runefang Steel on the most prominent areas, mostly corners and points.
Dark Skin

Step 1.
I decided I wanted to try a darker skin tone on this guy. To start with I base coated all of the skin with Doombull Brown. This required about 2 thin coats to get even coverage.

Step 2.
I then used Rhinox Hide as a shade, watering it down to the consistency of a wash. I carefully painted this into all of the recesses in the muscles. After this was done I went back with Doombull Brown and tidied up wherever I needed to.

Step 3.
The next step was to start adding highlights. I mixed in some Screaming Skull to the Doombull Brown and picked out all of the ridges on the muscles, as well as the fingers and hands.

Step 4.
I finished it off with a final, more refined highlight with even more Screaming Skull mixed in.
The Red

Step 1.
What Khorne model would be complete without red? I decided to pick out his tabard and hair tassel in red which were base coated with Khorne Red.

Step 2.
The tassel simply got a wash of Nuln Oil while the tabard was a bit more involved. Since it's a fairly smooth part of the model you need to be a bit more careful with your shading. I mixed in some black to the Khorne Red and watered it down close to a wash consistency. I painted this into the folds and then while it was still wet, tried to blend it into the edges with pure Khorne Red, also watered down. This was a bit of a back and forth process until I was happy with it. It takes a little more time, but it's worth it in the end since you don't want to have any stark lines on such a shallow fold.

Step 3.
Both of these areas were then highlights by mixing in Tau Light Ochre into the Khorne Red. I did two highlight stages with this, the final one being almost pure Tau Light Ochre. I then decided it wasn't light enough for me yet, so I mixed a little bit of Screaming Skull into my final highlight mix. This was painted on very selectively and was used more on the tassel than on the tabard.
The Leather

Step 1.
All of the leather areas were base coated with Rhinox Hide. Make sure you pick out all of the straps around the model, including the little pouch near his extra hammer.

Step 2.
These were then washed with Nuln Oil. You can see the wash is still a little wet when I took this picture.

Step 3.
I finished it off with a simple highlight of Gorthor Brown. The boots on this model have a lot of folds and creases, so just make sure you pick them all out. I could have done more here, including highlighting it with Rhinox Hide again before the Gorthor Brown and finishing it all off with a final highlight that included a bit of Screaming Skull, but I was aiming for simplicity and efficiency while still looking good.
The Metal

Step 1.
All of the iron/silver metal areas were base coated with Leadbelcher. The chainmail was given a solid coat because I will be relying on the wash to add definition to the interior of the rings.

Step 2.
All of the metal areas were given a wash of Nuln Oil. Be careful not to get this on areas we have already finished.

Step 3.
The metal areas were finished off with a simple line highlight of Runefang Steel.
The Bone and Wrappings

Step 1.
The skull and the wrappings on the hammer were base coated with Rakarth Flesh.

Step 2.
They were then both given a solid layer of Ushabti Bone.

Step 3.
I then washed both of them with Agrax Earthshade. On the skull I tried to focus it on only the areas that needed shading.

Step 4.
After the wash was dry I re-layered on the Ushabti Bone, making sure to leave the areas that need shadow darker. I finished it up with a line highlight of pure white.
The Fire

Step 1.
While I was painting the bone I base coated the fire with a solid coat of Ceramite White. Once that was dry I used the Lamenters Yellow and Bloodletter Red glaze paints to add some color. I painted the yellow on the half closer to the anvil and then made an orange glaze by mixing the two and painted that on the trailing end. I painted both of them on while they were still wet and tried to blend the two a bit.

Step 2.
I then went over that with some Blazing Orange and Golden Yellow respectively to strengthen the color more. I also blended these two where they met while they were still wet.

Step 3.
To finish it up I blended in some white right near where the flames meet the anvil and some black on the trailing end. I mostly used Nuln Oil for the black part and just built up a few layers of the shade. On the very end of it though I used Abaddon Black. I also added an orange glow around the flames with Blazing Orange. The vents on the anvil were given a base coat of Khorne Red, then a thinner line of Blazing Orange was painted inside of that, followed by Golden Yellow, and then pure white, getting smaller each time.
All you need to do now is base it to match your army and that's it! Your Khorne Skullgrinder is now ready to join your Bloodbound horde. I hope this was helpful and if you have any questions on how I painted it let me know in the comments below.
Until next time,
Tyler M.
No comments:
Post a Comment